Don’t get fooled by the version number: Windows Phone 8.1 isn’t just a minor update, but it’s a totally new version of our favorite operating system, both for users but, most of all, for developers. At a first glance, you may think that it’s the usual Windows Phone you already know, with its tiles and the familiar user interface. However, under the hood, there’s a huge number of new features that turns greatly improve the platform’s quality and experience.This new version was awaited since a long time and, finally, yesterday Microsoft has revelead it during the BUILD’s keynote, the most important Microsoft conference that is running in these days in San Francisco.

Since, if you’re reading this post, you’re probably a developer, let’s start by talking about all the new features that you probably care most about. Be prepared, because this is probably one of the longest posts I’ve ever wrote 
Welcome Windows Phone Store apps!
If you’ve ever tried to develop an application that targets both Windows Phone and Windows 8 you would have discovered that sharing code between the two platforms is not that easy: despite the fact that, under the hood, you can find the same framework, which is the Windows Runtime, there are a lot of features that are implemented using different classes and methods (like tiles, push notifications or the XAML controls). Windows Phone 8.1 changes everything, by sharing almost all the APIs and features that have been introduced in Windows 8. For this reason the new SDK has added a new kind of applications called Windows Phone Store apps: basically they are the same as Windows Store apps, but for Windows Phone, since they share almost all of the features and APIs. If we have already developed one or more Windows Store apps you’ll find yourself at home: application lifecycle, background tasks, XAML controls, etc. are exactly the same you can find in Windows 8.1. Also the package delivered by Visual Studio isn’t a XAP anymore, but it’s an AppX package, which contains a new manifest file called Package.appxmanifest.
For this reason Visual Studio now offers also a new template to create Universal Windows apps, which makes the life easier to developers that are willing to create an application that targets both Windows 8.1 and Windows Phone. This template includes two different projects for the two platforms, plus a new shared project: all the code we include will be automatically shared with the other projects, using the linked files approach. This means that the files that are part of the shared project are physically stored just in one location, but they are added as link to the other projects. This approach was already available in the past and it was, indeed, one of the strategies to share as much code as possible between a Windows Store app and a Windows Phone app: the difference is that, if in the past you were forced to use a lot of tricks and workarounds (like conditional compilation symbols) due to the many differences between the two frameworks, now everything is much easier, since the two runtimes are basically the same. This way you’ll be able to write your application’s logic just once and you’ll have just to take care to create two different user interfaces, due to the user experience’s differences between the tablet / pc world and the smartphone one (if this doesn’t mean that you won’t be able to reuse the same XAML code at all).
Another cool announcement related to Universal Windows apps is that, in the future, they’ll be able to run also on XBox One, bringing full convergence across all the screens: tablets, smartphones, computers and TVs.
The Windows Phone Store apps are completely based on the Windows Runtime, XAML included: we don’t have to deal anymore with the managed XAML available in Windows Phone 8, which was still based on Silverlight, but now we can work with native XAML, which offers much better performances. However, there’s a downside: due to the many differences, you won’t be able to automatically upgrade your existing Windows Phone applications to the new framework in the same way like, for example, you do now when you want to migrate a Windows Phone 7 app to Windows Phone 8. There are many reasons, like:
- The Windows Phone Store apps only support the new Windows Runtime APIs: as a consequence, all the old Silverlight APIs (like background tasks, tiles management, network interaction, ecc.) are no longer working.
- The new native XAML is based on a set of namespaces and controls which is different from the Silverlight ones: many controls, like Panorama or LongListSelector, are not available anymore and they need to be replaced.
- The application lifecycle and the navigation framework offered by the Windows Phone apps are very different from the Silverlight ones.
- Since the Windows Phone Store apps are no longer based on the .NET framework, all the third party libraries that still relies on it won’t work anymore. We’ll need to use specific versions of the libraries that can target the Windows Runtime (however, most of the libraries that are available for the Windows Store apps will work just fine).
If you’re already a Windows Phone developer, don’t panic! Microsoft didn’t leave you behind, but they’ve also updated the Silverlight runtime with the new 8.1 APIs and features, by introducing the Windows Phone Silverlight 8.1 apps. This means that you’ll be able to right click on an existing Windows Phone 8.0 project and choose the option Upgrade to Windows Phone 8.1: this way, you’ll be able to use almost all the new APIs (including the Windows Runtime’s specific ones, like the new background tasks or contracts) without losing the compatibility with your existing codebase. Of course, this approach has some downsides: it will be harder to share code with a Windows Store app (since the XAML, the application lifecycle, the navigation framework, etc. will continue to be different) and you’ll lose most of the performance improvements offered by the new runtime.
It should be clear, now, that Windows Phone 8.1 is totally compatible with Windows Phone 7.1 / 8.0 applications: you’ll need to update your application to 8.1 only if you’re planning to make use of some of the new features. Of course, the new 8.1 apps can be launched only on 8.1 devices: if you want to keep the compatibility with Windows Phone 8.0 and, at the same time, use the new 8.1 features you’ll have to maintain and publish two different projects. However this time, unlike it happened with Windows Phone 8.0, it’s just a temporary requirement: since Windows Phone 8.1 is going to be available as a free update to every Windows Phone 8 device on the market, in the long term you won’t be needed anymore to keep two versions of the same project, since eventually every user will be able to use just the 8.1 version.
In the end, the Windows Runtime has added a new important feature: WinJS support. Exactly like you can do nowadays with Windows Store apps, you have the chance to develop native applications (and not just simple web applications that are rendered using a WebBrowser control) using HTML and Javascript thanks to a library called WinJS, which grants access to all the Windows Runtime APIs and features using Javascript as a programming language, in replacement of C#, VB.NET or C++, and HTML as a design language, in replacement of XAML. At the same time, Microsoft has announced that WinJS is being released as an open source and cross platform library on GitHub.
Which framework should I choose?
Probably now, after reading about the coexistence of two frameworks, you were wondering which one you should choose to develop a Windows Phone 8.1 application. The first thing to consider is if you’re planning to develop a new app or to upgrade an existing one: if it’s the first case, the Windows Phone Store apps are, for sure, the most interesting path to take. If you’ve never developed a Windows Store app there will be a starting learning curve, since you’ll have to know and master all the differences with the old approach when you have to deal with lifecycle, navigation, background activities, etc. However, in the end you’re going to develop an application that can be easily ported to Windows 8.1 and that can take advantage of the new performance improvements introduced by the Windows Runtime.
On the other hand, if you already have an existing application and you just want to make use of some of the new Windows Phone 8.1 feature, the simplest path to take is to keep using the Silverlight framework: this way you’ll be able anyway to make use of the new features without having to rewrite the application from scratch. Then, in the future, when Windows Phone apps will take off and the number of supported libraries will increase, you may evaluate to migrate your existing application to the new runtime.
However, there’s another series of things that are important to keep in mind when you have to make this choice: there is a list of features that, for timing and resources issues, the team wasn’t able to make available in both frameworks. For this reason, if you choose to develop a Windows Phone app, you won’t be allowed to:
- Use the APIs to interact with the clipboard
- Define your app as a lock screen provider, so that it can change the lockscreen’s wallpaper
- Define your app as a ringtone provider
- Use Alarm and Reminders
- Develop a Lens App (which are photographic apps that can be integrated with the native camera app)
- Keep an app running under the lock screen
- Use the Continuous Background Tracking APIs, that can be used to continuosly track the user’s position even when the app is not in foreground
- Use VoIP APIs
- Use the CameraCaptureTask, which is the chooser that can be used to take a picture with the native camera app and import into your application
On the other side, if you develop a 8.1 application using the Silverlight framework you won’t be able to:
- Use the old APIs to manage background audio. You will have to migrate to the new Windows Runtime APIs or keep your application as a Windows Phone 8.0 app
- Make use of the new XAML framework, which is able to fully support devices with different screen sizes
- Use the new XAML controls, like Hub or GridView
- Use the new APIs to edit videos
- Use the new Visual Studio tools for profiling and coded UI tests
It should be clear now that the framework’s choice can’t be based just on the type of application (new or existing one) but also on the features you want to use: if, for example, you’re developing a Lens App or an images catalogue app which acts as a lock screen provider, you’ll be forced to develop a Windows Phone Silverlight 8.1 app.
New Stores shared experience
Thanks to the Universal Windows apps ,both Windows 8 and Windows Phone stores introduce a new shared experience for our apps: we’ll be able to publish the two versions of our app on both stores but, since they’ll share the same application identifier, the user will be able to buy it just once and install it on all his devices. In addition, you’ll be able to share settings and in-app purchases between your Windows Phone and Windows Store app.
New development tools and emulator
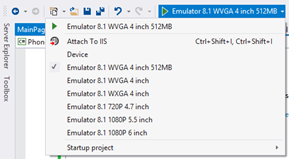
The Windows Phone 8.1 SDK is completely aligned with the latest Microsoft development technologies: the SDK, in fact, is based on Visual Studio 2013 which, for the occasion, has been updated to the Update 2 RC release. There are also many improvements with the emulator: the first thing to mention is that now it’s able not just to simulate different resolutions, but also different screen sizes. This scenario is becoming more and more important every day, since in the mobile market you can find devices with very different screen sizes: from small devices, like the Lumia 620 (3.8 inches) to phablets, like the Lumia 1520 (6 inches). Now, in the debug dropdown menu, other than the usual indicator about the supported resolution (like WXGA, WVGA, 1080p, etc.) you’ll find also the screen size, as you can see in the following image.
The second news is connected to the touch screen simulation: finally we’re able to simulate multi touch gestures (like pinch to zoom) also using the mouse, while previously the only way to do that was using a touch screen device.
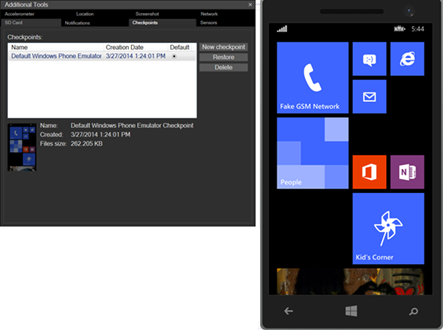
The third and last new feature is connected to the additional tools that are bundled with the emulator: Windows Phone 8.0 introduced some nice tools to simulate geo location or accelerometer. Windows Phone 8.1 has added to the list:
- A tool to simulate the type and the network speed (Wi-Fi, 2G, 3G, etc.)
- A tool to simulate push notifications: we won’t have anymore to send real push notifications from a server application to test if our Windows Phone app correctly manages them
- A tool to simulate the SD card: we can set up a folder and make the emulator thinks that it’s a removable card, so that we can test the new APIs to read and write data from a SD card
- A tool to create emulator’s snapshot: the Windows Phone emulator automatically resets itself when it’s closed, including all the data we’ve created (installed apps, storage, etc.). With this new feature we’ll be able to create checkpoints of a specific status and restore them in a second time.
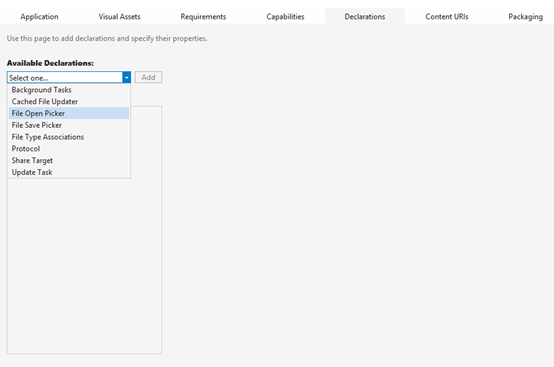
Another news connected to Visual Studio is a new manifest file, which is now included in the project’s root and it’s called Package.appxmanifest: it’s very similar to the Windows Store apps one and, other that supporting features that should already be familiar to Windows Phone developers, like assets and capabilities managements, we can find new sections like Declarations, which can be used to set up the contracts and the various extensibility points of the application. Another new important feature that we can find in the manifest file is the ability, for the user, to install our application on a SD card: as developers, we are able to disable or enable this feature.
The new Windows Phone 8.1 features for developers
It would be almost impossible to deeply analyze all the new Windows Phone 8.1 features, since the list is too big. In this post I will just highlight the most important ones.
Application lifecycle and navigation framework
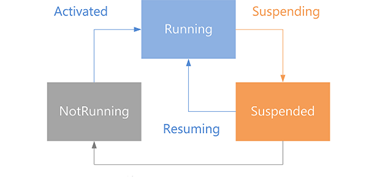
The Windows Phone Store apps’ lifecycle is the same supported by the Windows Store apps and it has many differences with the old one offered by the Silverlight framework. Under the hood, the architecture is very similar: the application, when it’s suspended, gets “frozen”, which means that every thread and operation is aborted; this way, the application will keep using just memory, but all the other resources (hardware sensors, CPU, etc.) will be released. Without a warning, the operating a system is able to kill a suspended application, in case the left memory is not enough to allow the user to open new applications: as developers, we are required to manage this scenario (which in Windows Phone 8.0 was called tombstoning) to properly save and load the application’s state, so that the user can act like if the application has never been terminated. The main difference with the old approach is that now applications are always suspended: if the user presses the Back button in the first page of the app, it won’t be closed anymore but just suspended, like if he has pressed the Start button. This means that the system, regardless of the way the user will open back the application (using the task switcher, tapping on the tile in the Start screen, etc.), will always resume the previous instance (unless he has explicitly closed the application tapping on the X icon that is displayed in the task switcher).
The other big difference with the previous runtime is the navigation framework: as a standard behavior, the Back button doesn’t automatically redirect anymore the user to the previous page of the app, but to the previous app in the operating system’s stack. If we want to keep the previous navigation approach we need to intercept the Back button and redirect the user to the previous page: by default, the new Visual Studio templates include some code snippets that will take care of this scenario for you. Another new feature connected to the navigation framework is that the NavigationService class is now gone and it has been replaced by the Frame one, which represents the page’s container of the application and, thus, it offers all the methods to move the user from one page to the other. One of the biggest advantages of this class is that it’s not connected anymore the old Silverlight approach, which was based on Uris and, as a consequence, it allowed us to carry only textual parameters from one page to the other: now we are able to exchange also complex objects.
Another new important feature is that Windows Phone now fully support the contracts approach, which are a way to extend our applications and integrate them in the operating system. One of the most useful contracts is called sharing and it allows developers to create apps that are able to share a content to another app (in this case, we talk about sharing source apps) or to receive a shared content from another app (in this case, we talk about sharing target apps). The contracts approach introduce a new behavior in the application lifecycle: the app can be opened not just by the user, but also from another app; exactly like we do in Windows Store apps, the App.xaml.cs file is able to manage all the entry points of our application

If you decide to keep using the Silverlight framework, no one of the just explained features will apply to you: the Back button will continue to redirect the user to the previous page within your app and, if it’s pressed in the main page, it will close it. The only difference is that, now, Fast App Resume is enabled by default: the suspended instance of your application will be always resumed, regardless of the entry point.
The new XAML features
The new XAML runtime includes a lot of new controls and features, which are aligned to the Windows Store app ones: for this reason, the Windows Phone Toolkit is not needed anymore for Windows Phone apps, since all the controls are now included in the Windows Runtime. We can split the controls in three different categories:
- Common: these are the controls that have the same visual layout and behavior on both platforms, like Button, TextBlock and TextBox
- Optimized: these are the controls which have the same behavior, but a different visual layout to match the platform’s guidelines. The DatePicker controls is a sample of this category: the behavior is the same on both platorms (it can be used to choose a date), but on Windows 8 it’s rendered as a series of dropdown menus, while on Windows Phone 8.1 it’s displayed in a new page.
- Signature: these are the unique controls that are available only on one platform or that are available on both, but with a completely different layout and behavior. The Pivot control is part of the first category, since it’s available just in Windows Phone. The AppBar control, instead, is part of the second one: it’s available on both platforms, but with a completely different implementation.
The biggest advantage of this approach is that we’ll be able to reuse the same XAML on both platforms: by using UserControls we’ll be able to share not just the logic, but also part of the user interface between the Windows Phone and the Windows Store app.
The new XAML runtime includes also many new changes when you have to deal with signature controls:
- The Panorama control has been removed and replaced by the Hub one
- The application bar is now implemented using the AppBar control, which supports two kind of commands: PrimaryCommands and SecondaryCommands. In Windows Store apps the difference between the two categories is referred to the position of the commands (on the left or on the right of the screen); in Windows Phone apps, instead, we can distinguish between icons (the PrimaryCommands controls replace the old ApplicationBarIconButton ones) and menu items, which are displayed only when the application bar is expanded (in this case the SecondaryCommands controls replace the old ApplicationBarMenuItem ones). Another important news, especially if you work with the MVVM pattern, is that now the AppBar control fully supports binding, both to define properties and commands.
- Windows Phone 8.0 introduced a new control called LongListSelector to manage grouped data collections (like the hub People, for example, groups the list of contacts by the first letter of the name). However, it wasn’t really simple to use: one of the biggest limitations was the requirement to create a new class to manage the grouping, instead of allowing us to work directly with the original data collection. Now the LongListSelector has been removed and replaced by two controls that should already be familiar by the Windows Store apps developers: GridView and ListView. These controls, other than being optimized to manage large collections of data, help us to simplify the code needed to manage grouping. In addition, they support the semantic zoom concept, which has been added in Windows 8 and can be used to quickly see all the available groups and jump from one to the other.
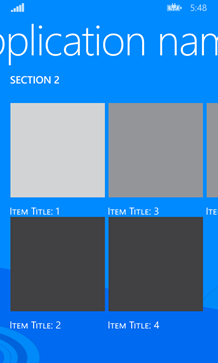
The other big news connected to the XAML runtime is the new layout management: Windows Phone Store apps don’t have anymore a fixed layout that is automatically scaled according to the phone’s resolution, but they uses a fluid layout, that is able to adapt to any resolution and any screen size, exactly like the Windows Store apps do to properly support at the same time small tablets and big monitors.
All the new XAML features mentioned in this section are available just for the Windows Phone Store apps: the Silverlight apps keep using the old XAML frameworks and, as a consequence, you won’t find the new controls.
Dealing with local data: the storage APIs
Windows Phone 8.0 did a first attempt to unify the storage APIs with the Windows Runtime ones, by introducing classes like LocalStorage, StorageFolder and StorageFile. Windows Phone 8.1 completes this unification, by supporting all the features and APIs that were still missing in Windows Phone 8.0. The most important features are:
- A new way to manage settings
- A new storage called TemporaryStorage, which can be used for caching purposes: the storage’s content, in fact, is automatically erased by the operating system
- A new storage called RoamingStorage, which has a limited size (100 KB) but which content is automatically synced with all the other devices that are have been configured with the same Microsoft Account (regardless if they’re Windows Phone devices or Windows 8 tablets or computers).
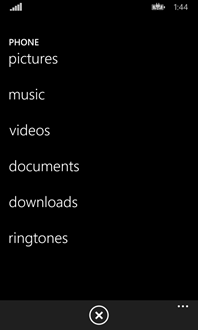
Another important new feature is the capability to access to all the data that is stored in the multimedia library of the user: thanks to the KnownFolders class (which offers different storage’s types, like PicturesLibrary, MusicLibrary and VideosLibrary) you’ll be able to access (both for reading and writing purposes) to all the user’s pictures, videos and audio tracks. The same limitation has been removed also when you want to deal with the SD card that is supported by some devices: now you’ll be able to read and write data on the external memory. In the end, in Windows Phone 8.1 we are able to better manage and import file from other applications or from the phone, by using the FileOpenPicker and FileSavePicker classes.
Geolocalization and geofencing
The biggest new feature introduced in Windows Phone 8.1 connected to the geo location services is geofencing support, which was already introduced in Windows 8.1: with the new APIs you’ll be able to define an area on the map and, when the user walks into it, your app will be notified, even if it’s not running thanks to a new kind of background task. There are a lot of scenarios that can make use of this new feature: let’s think about an application connected to a commercial activity, that can notify to the user all the promotions that are running in the shop he has just walked in.
The new geolocation APIs offers also a complete unification with the Windows 8.1 ones: the only exception is with the maps controls which has two different implementations at the moment. In Windows 8.1, in fact, you still have the Bing Maps control, while in Windows Phone you can use the Here Maps one, which uses the Nokia services.
Tile, notifications and notification center
Windows Phone 8.1 introduces big news in the tiles management: instead of the original 3 templates available in Windows Phone 8.0, now you have access to the full catalog of 40 templates that are available in the Windows Runtime and that are shared with Windows 8.1. The new templates are much more flexible than the old ones: now you can manage multiple images, text lines or badges. The tile architecture is the same we’ve learned with Windows Phone 8.0: every tile is represented by a XML layout, which contains all the properties that define the visual layout of the tile. The difference is that, now, the templates are shared with the Windows Store apps and automatically adapted to the platform: in case there are some properties that can’t be rendered on one of the two platforms, they will simply be ignored. The same applies for toast notifications: the code to define a toast is exactly the same, but the visual layout they will look very different between Windows Phone 8.1 and Windows 8.1.
An important difference to highlight between the old and the new approach is that the XML layout is used for any scenario: in Windows Phone 8.0 XML was required just for push notifications, while in a background agent or within the app you were able to use classes like ShellTile and ShellToast. In Windows Phone 8.1, instead, tiles and toasts are are always represented using XML data: you’ll need to manipulate the XML document to set the different tile properties, like in the following example.
private void OnSendNotificationClicked(object sender, RoutedEventArgs e)
{
    XmlDocument xml = TileUpdateManager.GetTemplateContent(TileTemplateType.TileWideText01);
    XmlNodeList nodes = xml.GetElementsByTagName("text");
    nodes[0].InnerText = "This is the text";

    TileNotification notification = new TileNotification(xml);
    TileUpdateManager.CreateTileUpdaterForApplication().Update(notification);
}
In case you prefer to use a more traditional approach, based on classes and objects, you can find on NuGet a library provided by Microsoft called NotificationsExtensions. By using it, you’ll be able to change the previous code like the following one:
private void OnSendNotificationClicked(object sender, RoutedEventArgs e)
{
    ITileWideText01 tile = TileContentFactory.CreateTileWideText01();
    tile.TextBody1.Text = "Line 1";
    tile.TextHeading.Text = "Title";

    TileNotification tileNotification = tile.CreateNotification();
    TileUpdateManager.CreateTileUpdaterForApplication().Update(tileNotification);
}
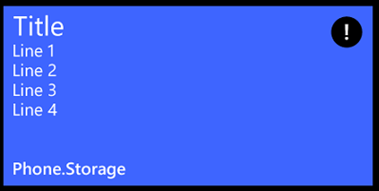
This new approach improves a lot the tile and toast management for developers, especially when you have to deal with push notifications. We’ll be able, in fact, to send from a server application (like a cloud service) the same exact notification to Windows Phone and Windows Store apps and they’ll both be able to receive it with success. As a consequence, you probably have already guessed another new important feature introduced in Windows Phone 8.1: push notifications are now sent using the WNS (Windows Notification Service, which is the service used for Windows Store apps) instead of the old MPNS (Microsoft Push Notification Service). The architecture is the same: the application subscribes to receive notifications and receives from the WNS a URL that univocally identifies the channel; server side, when you want to send a notification to the device, you simply send a HTTP request using a POST command do the URL that identifies the channel: the body of the request is the XML data that represents the notifications. This way, you’ll be able to unify the push notifications management in your backend service: we’ll be able to send the exactly same notification to both platforms.
If you already have an existing app which uses push notifications, don’t worry: MPNS is here to stay and you’ll be able to keep using it. However, if you want, you’ll be able to use the new tiles management and the Windows Notification Service also from a Windows Phone Silverlight 8.1 app.
For sure, the biggest new feature (especially from the user point of view) connected to notifications is the action center: by swiping from the top to the bottom of the screen we’ll be able to access to this new screen, which stores all the toast notifications that all your apps have received. The action center fills one of the biggest Windows Phone 8.0 limitations: if the user received a notification while he was distracted and the app wasn’t set up to display notifications on the lock screen or on the tile, the user didn’t have any chance to retrieve it. Now, instead, all the notifications are automatically stored in this new view, grouped by application. As developers, this new feature is completely transparent: automatically, all the toast notifications that are sent to our application will be automatically kept in the action center. However, we have the chance to interact with it thanks to some properties that are exposed by the ToastNotification class (which identifies, as you can imagine, a toast notification): for example, we can define after how much time the notification should disappear from the action center (by using the ExprationTime property) or we can send to the application “ghost notifications” (by setting to true the SuppressPopup property), that are not displayed to the user in the regular way but they are simply stored in the action center. We can also remove notifications generated by our application, by using the ToastNotifcationHistory class.

Background operations
Windows Phone 7.5 introduced background agents, which are separated projects that contains some code that can be executed periodically from the operating system even when the application is not running. Windows Phone 8.1 improves this area by following, again, the Windows Runtime approach: we’ll keep working with separated projects called background tasks, which offers much more flexibility than the old background agents. Background tasks, in fact, are based on triggers: if background tasks were limited to be executed according to specific time conditions (for example, every 30 minutes), background tasks, instead, can be automatically activated due to a system status change (SystemTrigger, like Internet connection available or not available); when the user walks into a specific are (LocationTrigger, they are connected to the new geofencing APIs); when the app receives a push notification (PushNotificationTrigger); when the device connects or disconnects with another device using Bluetooth (BluetoothSignalStrengthTrigger). If you just need to recreate the old background agent experience don’t worry, you have also some triggers for that, like TimeTrigger (which can be used to peridocailly run the background task, the minimum intervalis 15 minutes) and MaintenanceTrigger (which replaces the ResourceIntensiveTask and can be used to perform long running operations that should be execute only when the phone is charging).
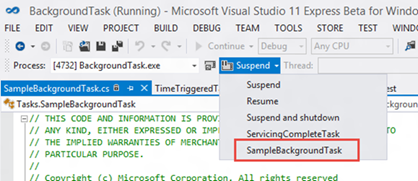
Thanks to Visual Studio improvements, it’s now easier also to test background tasks: in the Debug toolbar now we have a useful dropdown menu that can be used to trigger a background task’s execution anytime we need.
There are also some regardless other background scenarios, which, again, have been aligned to the Windows Runtime APIs:
- Background transfers are now achieved using the BackgroundDownloader and BackgroundUploader classes, which are more flexible
- You can develop multimedia applications that can reproduce audio in background using a new set of APIs, which area great improvement compared to the old ones
New APIs to interact with other devices
Windows Phone 8.0 added a new set of APIs called Proximity APIs, which can be used to interact with other devices using technologies like NFC and Bluetooth. Windows Phone 8.1 adds a bunch of new features in this category, by introducing support to two new technologies:
- Bluetooth Low Energy (BLE), which is a new Bluetooth standard that is widely used by many new devices on the market like smart watches, fitness bracelets, medical equipment, etc. Windows Phone 8.0 Update 3 introduced the support to these kind of devices, but just from a user point of view: the phone was able to connect to some of these devices and interact with them. Now, instead, we are able to interact with these devices also from third party applications
- Wi-Fi Direct, which is a technology that can be used to establish a direct connection between two devices using Wi-Fi
Multimedia
Windows Phone 8.1 introduces a new set of APIs called Media Foundation APIs, which were already part of the full Windows Runtime in Windows 8: you’ll b able to developer advanced applications that are able to manipulate audio and video and to play multimedia content. There’s also a new set of APIs inside the Windows.Media.Editing namespace, which can be used to perform video editing operations: we’ll be able to developer apps that will allow the user to trim, add effects or manipulate videos that have been recorded with the phone.
Inside this category we can find also some new classes that can be used to record the user’s activity on the screen: we’ll be able, for example, to include a recording feature inside our game, so that the user can share his best match with his friends or on social networks.
The new consumer features
Windows Phone 8.1 isn’t just a big update for developers, but also for users: other than being able of make use of all the new features that the application will be able to implement, users will find many new features integrated in the operating system. Here are the most important ones:
- A new feature called Cortana, which acts both as a vocal assistant (she’s able to interact with the user by voice) and as personal assistant (she’s able to remind you important things, scan your mail to plan your travels, etc.). Plus, third party applications will be able to integrate with it, so that Cortana can search data directly in your application.
- New start screen customization: now you can set a background image, which is applied to all the transparent tiles with a parallax effect; in addition, you can reduce the tile size, so that you can display a third column even on devices without a big screen.
- The action center, other than being a container for all the toast notifications received by the applications, gives quick access to the network settings: you’ll be able to quickly enable or disable Wi-Fi, Bluetooth, etc.
- Complete backup of the phone, including the tile layout on the Start Screen.
- The Store app has been completely redesigned, to give more visibility to the best applications.
- Now you can force the Store to check updates for the installed apps or, like in Windows 8, you can enable auto update, so that apps are automatically updated without manual confirm from the user.
- New Calendar app, with new options (like weather forecast) and a new weekly view.
- New Camera app, with support for burst mode (the camera takes many photos at once, so that you can choose the best one and discard the others).
- Internet Explorer 11, which improves support for the latest web standards (HTML5, WebGL, etc.); automatic bookmarks sync with your Windows 8 pc or tablet; integrated password and download manager; Reading mode, which is able to adapt a page’s layout so that it’s easier to read.
- New enterprise features: VPN support, better devices management, new policies to decide which apps can be installed from the store, encrypted mails support, Wi-Fi enterprise support, etc.
- New swipe keyboard, that can be used to insert texts without releasing your finger from the touch screen
- New Sense applications: Battery Power Sense, to keep track of the battery usage made by every single app; Wi-Fi Sense, to share your Wi-Fi connections with another device; Storage Sense, to keep track of the storage occupied by every app.
- You can project your phone’s screen on another screen, like a monitor or a TV, both with a wired connection (using the USB cable) and with a wireless one, using Miracast
Wrapping up
As you can see, Windows Phone 8.1 is more than just a simple update: it’s a new starting point, that adds a new and important piece of the puzzle of the Microsoft ecosystem. If you already are a Windows Phone developer, this new release will give you the chance to push your application even further: thanks to the new features, you’ll be able to easily port your application to Windows 8.1, giving you more chances to make money and to increase your number of users.
On the other side, if you already are a Windows Store app developer, you’ll find yourself at home: one of the biggest complaints in the past was that, even if Windows Phone 8 and Windows 8 apps shared many similarities (like the application lifecycle, the user interface approach, etc.) most of them were implemented with totally different APIs. Now, instead, this problem has been fixed and there are only a few scenarios where you won’t find APIs convergence (and, in most of the cases, this happens just because there are some scenarios which don’t make sense both on tablets and smartphones).
And now, let’s share some release dates:
- During the BUILD’s keynote Microsoft announced also a new update for Windows 8.1, which brings some features that will improve the desktop experience. The update is already available for MSDN subscribers and it will be released on 8th April via Windows Update to every Windows 8.1 device.
- MIcrosoft will release a Windows Phone 8.1 Preview for existing phones via the Preview for Developers Program during April.
- Starting from May / June, vendors and operators will start to release Windows Phone 8.1 as an OTA (Over The Air) update to every existing device
- Later this month Microsoft will also open the Store to accept the submission of Windows Phone 8.1 apps
And here are some links that can be helpful:
We have just scratched the surface! In the upcoming months we’ll have the chance to cover more deeply all the new features and to learn how to implement them in our applications!


