How to get write access to a prepopulated SQL CE database in a Windows Phone application

SQL CE is one of the most appreciated features for developers introduced in Windows Phone 7.5: before SQL CE the only way to store data locally was serialization or remote services (for example, on the cloud). With SQL CE, instead, we have full access to a relational database and we can work with familiar concepts like tables, relations and so on. Windows Phone officially supports two ways to work with a SQL CE database:

  • Code first: the database is created starting from the definition of our entities. We create a class for each entity and, with the help of some special attributes, the database is created when the application is launched for the first time. These attributes will help us to define the tables, the columns, the relations and so on. Since the database will be created when the application is launched, it will be obviously empty.
  • Read only: the database is created out from the application, with an external tool (like the Server Explorer tool, that is part of Visual Studio). The file will be a SDF file, that will be included into the Visual Studio project. This solution is the best choice when we have a prepopulated database and we need to display the data in our application. The downside of this approach is that the database will be read only: we’ll be able only to read data from it, we won’t have write access.


In my experience I had often the need to have best of both worlds: I have a database that is prepopulated with data that is displayed in the application but, at the same time, I want the chance to write stuff. There’s a way to do it: copying the database in the isolated storage when the application is launched for the first time. This way, we can simply add the database to the project like if we want to use it in read only mode: after we’ve copied it into the storage, we will be able to write data into it like if it was created in code first mode.

The code to achieve this result is not really straightforward, so please welcome SQL Server Compact Toolbox: I’m a big fan of this extension, developed by the fellow MVP ErikEJ, and I’ve used it extensively in my Windows Phone project. It’s a Visual Studio extension, so it can be installed directly from the Visual Studio Gallery.

This extensions provides a series of utilities that come in handy when you work with SQL CE database: one of them is the Windows Phone support, that allows, starting from an existing SQL CE database, to generate all the classes needed to work with it in a Windows Phone application (both entities and data context).

And what about our scenario? The generated data context contains a method called CreateIfNotExists, that overrides the original data context methods that are used to check if the database already exists, and if not, to create it. Basically, this the the code that we were writing in the past:

using (CommunityDaysContext db = new CommunityDaysContext(CommunityDaysContext.ConnectionString))
{
    if (!db.DatabaseExists())
    {
        db.CreateDatabase();
    }
}

Using SQL Server Compact Toolbox we can simply write instead:

using (CommunityDaysContext db = new CommunityDaysContext(CommunityDaysContext.ConnectionString))
{
    db.CreateIfNotExists();
}

This method will return true or false to reflect if the database has been created or not. If you take a deeper look to the DataContext class generated by SQL Server Compact Toolbox you’ll notice that the CreateIfNotExists method is much more than simply a wrapper to the original DataContext methods: that’s because the method contains all the logic needed to check if there’s a SQL CE database embedded into the project and to copy it into the Isolated Storage.

To trick the magic we simply have to copy the SDF file into our project and make sure that the Build Action (that can be changed in the Properties panel) is set to  EmbeddedResource.

And now you’re done: simply call the CreateIfNotExists when the application is starting  (for example, in the Application_Launching event inside the App.xaml.cs file, or when the MainPage of your app is loaded) and the database will be copied into the isolated storage. To access to it you’ll have to use the regular connection string (since it’s not a read only database): the generated DataContext will automatically provide it with the ConnectionString static property.

Watch out the database size!

Be careful that the bigger is the database, the longer is the time needed to copy the database into the storage. Remember to provide a loading animation in case the loading operation is longer than 2 or 3 seconds and to postpone it after that the application is fully loaded, otherwise you’ll risk to exceed the 5 seconds time limit allowed to display the splash screen.

What if the database is stored in another project?

If, as a developer, you are used to split your solution in different projects (for example, one for the main application, one for the services, etc.) you may find yourself in the situation where the database is stored in one project, while the entities and the data context in another one.

In this case, the code generated by SQL Server Compact Toolbox won’t work, because the CreateIfNotExists method will look for the database inside the same assembly of the application (using reflection). Don’t worry, there’s a workaround! The first step is to change the Build Action of the database to Content, then you’ll have to change the CreateIfNotExists method in the following way:

public bool CreateIfNotExists()
{
    bool created = false;
    using (var db = new DbContext(DbContext.ConnectionString))
    {
        if (!db.DatabaseExists())
        {
            //string[] names = this.GetType().Assembly.GetManifestResourceNames();
            //string name = names.Where(n => n.EndsWith(FileName)).FirstOrDefault();
            StreamResourceInfo stream = Application.GetResourceStream(new Uri("Database/Recipes.sdf", UriKind.Relative));
            if (stream != null)
            {
                using (Stream resourceStream = stream.Stream)
                {
                    if (resourceStream != null)
                    {
                        using (IsolatedStorageFile myIsolatedStorage = IsolatedStorageFile.GetUserStoreForApplication())
                        {
                            using (IsolatedStorageFileStream fileStream = new IsolatedStorageFileStream(FileName, FileMode.Create, myIsolatedStorage))
                            {
                                using (BinaryWriter writer = new BinaryWriter(fileStream))
                                {
                                    long length = resourceStream.Length;
                                    byte[] buffer = new byte[32];
                                    int readCount = 0;
                                    using (BinaryReader reader = new BinaryReader(resourceStream))
                                    {
                                        // read file in chunks in order to reduce memory consumption and increase performance
                                        while (readCount < length)
                                        {
                                            int actual = reader.Read(buffer, 0, buffer.Length);
                                            readCount += actual;
                                            writer.Write(buffer, 0, actual);
                                        }
                                    }
                                }
                            }
                        }
                        created = true;
                    }
                    else
                    {
                        db.CreateDatabase();
                        created = true;
                    }
                }
            }
            else
            {
                db.CreateDatabase();
                created = true;
            }
        }
    }
    return created;
}

In this code we’ve changed the loading by reflection with the Application.GetResourceStream method, that is able to load a resource inside the XAP (so it works even if the database is not in the same project) as a Stream. This method requires, as input parameter, the Uri of the file (starting from the root of the project): in the example, the database is called Recipes.sdf and is placed inside the Database folder.

That’s all! Have fun with SQL CE and Windows Phone!

Posted in Windows Phone | Tagged | Leave a comment

How to create cool custom tiles in a Windows Phone application

The APIs provided by Windows Phone to create secondary tiles or to update the main tile are very simple to use, but not very flexible: you can set a title, a background, a counter, etc., but you can’t use a custom layout (even simple scenarios, like breaking the title in two lines, aren’t supported).

One way to override this limit has been suggested directly by Microsoft itself in this post: the idea is to create a custom XAML control and to “capture a screenshot” of the control itself, that can be used as background of the tile.

The benefit of using this approach is that we have total control on the tile layout: since it’s a standard user control, we can add all the XAML controls we want and, at runtime, customize them. For example, we can insert a TextBox control and change the text simply by changing the Text property.

The downside is that the code needed to achieve this result is not really straightforward: we have to manually convert the user control into an image and save it to the storage.

For this reason, please welcome the Ree7 Tile Toolkit for Windows Phone 7, an open source library (available on NuGet or on Codeplex) that does all the dirty work for us: the approach is the same described before, but the toolkit will take care of converting our XAML user control into an image automatically. The basic idea behind this toolkit is that it’s able to convert any object that inherits from the UIElement class (basically, any visual control in the Silverlight for Windows Phone Runtime).

Let’s start to take a look to one of the most important features of the toolkit: the templates support.

Templates

A template defines the layout of a tile: the toolkit support two kinds of templates.

  • A standard template, that is built in into the library, that can be used to create tiles with the same look & feel of the Messages hub or the Mail hub: a title, an image and, on the right, a counter (in the Messages hub, for example, it’s used to display the number of unread messages).
  • A custom template: as explained before, any object that inherits from the UIElement class can be used as a template.

During this post we’ll see how to use the standard template: in the next one we’ll cover how to use the custom one.

The standard template

The standard template provided by the toolkit supports four different customizations: the title, the background image, an icon and the counter. You can see an example in the following image.

Here is how to create this custom tile by code (obviously, you should already have added the library to your project, NuGet is the easiest and best way to do it)

public void Create()
{
    NativeCountTileTemplate template = new NativeCountTileTemplate
        {
            AppName = "Sample app",
            Count = "10",
            Icon = new BitmapImage(new Uri("/SampleTileIcon.png", UriKind.Relative)),
            Background = null
        };

    CustomTile tile = CustomTileFactory.GetTemplatedTile("SampleTile", template, TileSize.Standard);
    ShellTile.Create(new Uri("/MainPage.xaml?ID=1", UriKind.Relative), tile.GetShellTileData());
}


The standard template is identified by the class NativeCountTileTemplate, that can be customized using the four properties AppName, Count, Icon and Background. Using these properties is really straightforward: just keep in mind that the Background property’s type is Brush, so we can set it using any of the Brush objects available in Silverlight (like SolidColorBrush if we want to use a simple color, LinearGradientBrush or RadialGradientBrush if we want to use a gradient and ImageBrush if we want to use an image). If we set this property to null (like in the example) the background will be transparent: this means that the background color will be the same of the phone accent color.

The next step is to create a CustomTile object using the CustomTileFactory class: the method GetTemplatedTile requires three parameters, that are the name of the tile (be aware that this name is used for the filename of the image generated by the toolkit, so if you want to create multiple custom tiles use different names), the template to use (in the example, the NativeCountTileTemplate object) and the tile size (that is a value of the enumerator TileSize; actually the only supported value is TileSize.Standard, but it’s been introduced to support future scenarios).

In the end, we create the tile in the usual way: we call the Create method of the ShellTile class passing the deep link uri and the data tile (that can be retrieved by calling the GetShellTileData method on the CustomTile object).

Using a custom template

The first step to use a custom template is to create a XAML user control: to do this let’s add to our project a new item which type is Windows Phone User Control.  What’s a user control? It’s a XAML based piece of code that works exactly like a Windows Phone page, except that it can be reused in multiple pages like a simple Silverlight control. The user control has its own layout (defined in the XAML) and logic (defined in the code behind).

For our needs, the custom control won’t have any logic: it will manage just the layout of the tile. Here is an example of an empty layout, where we simply set the Grid size to 173×173, which is the standard tile size.

<UserControl x:Class="TileHelper.Tile"
    xmlns="http://schemas.microsoft.com/winfx/2006/xaml/presentation"
    xmlns:x="http://schemas.microsoft.com/winfx/2006/xaml"
    xmlns:d="http://schemas.microsoft.com/expression/blend/2008"
    xmlns:mc="http://schemas.openxmlformats.org/markup-compatibility/2006"
    mc:Ignorable="d"
    FontFamily="{StaticResource PhoneFontFamilyNormal}"
    FontSize="{StaticResource PhoneFontSizeNormal}"
    Foreground="{StaticResource PhoneForegroundBrush}"
    d:DesignHeight="173" d:DesignWidth="173">

    <Grid x:Name="LayoutRoot" Width="173" Height="173">
        <StackPanel Margin="5, 0, 0, 0">
            <TextBlock Text="This is a text" />
            <TextBlock Text="This is another text" />
        </StackPanel>
    </Grid>
</UserControl>

Inside the Grid we can add all the needed control to create our custom layout. When we are ready, we can create the tile in the code using the same APIs we’ve used before. The difference is that, this time, we won’t use as template the NativeCountTileTemplate object, but the custom control we’ve just created. This custom control will be passed as parameter of the CustomTemplateFactory.GetTemplateTile method, like in the following example:

public void Create()
{
    Tile customTemplate = new Tile();

    CustomTile tile = CustomTileFactory.GetTemplatedTile("SampleTile", customTemplate, TileSize.Standard);
    ShellTile.Create(new Uri("/MainPage.xaml?ID=1", UriKind.Relative), tile.GetShellTileData());
}


Tile is the name of the class of the user control we’ve created: we simply create a new user control instance and we pass it to create the CustomTile object. This is an example of the final result:

In this example we’ve created a custom template, but the content is fixed: the value of the the two TextBox controls is always the same. In a usual application, instead, the layout of the tile can be different according to the scenario: for example, if we need to create multiple tiles, some properties (like the title) will be different.

Achieving this goal is really simple: we simply have to give a name (setting the x:Name property) to the controls that we need to modify and, in the code, we use the FindName method (exposed by every UIElement object) that simply returns a reference to a control according to its name. This way, we can change the control properties directly in the code, like in the following example:

public void Create()
{
    Tile customTemplate = new Tile();
    TextBlock first = customTemplate.FindName("txtFirst") as TextBlock;
    TextBlock second = customTemplate.FindName("txtSecond") as TextBlock;

    first.Text = "Hello";
    second.Text = "World";

    CustomTile tile = CustomTileFactory.GetTemplatedTile("SampleTile", customTemplate, TileSize.Standard);
    ShellTile.Create(new Uri("/MainPage.xaml?ID=1", UriKind.Relative), tile.GetShellTileData());
}

After creating a new instance of the custom control, we look for a reference to the two TextBlock controls: once we have it, we simply change the Text property. The next steps are the same described before, nothing changes: we create a new CustomTile object using the custom control instance as template. Here is an example of the final result:

Other alternatives

There are other alternatives to achieve the same result: for example, the Telerik controls suite features a control that behaves exactly in the same way. The biggest advantage of the Ree7 toolkit is that is free and open source, so you can change it to adapt to your needs and you can use it in your projects free of charge.

Posted in Windows Phone | Tagged | 4 Comments

How to open Internet Explorer by code in a Metro style application

Recently I’ve worked on a Windows 8 application to promote my blog: people can use it to read my posts within the application and to be notified (using both toast and tile notifications) every time a new post is published. The application uses a web view to display the detail of a post: the problem came when I had to manage the snapped view, since there isn’t enough space on screen to display a web view.

During the pre certification lab that I’ve attended in Microsoft Italy the trainer gave me a good tip: in case the application is snapped, the post detail should be opened using Internet Explorer and not inside the application. In fact, in this scenario, Internet Explorer will open in filled mode and the user will be able to read the post without any difficulty.

In a Windows Phone application this behavior is easy to implement, thanks to the WebBrowserTask launcher. How to do the same in a Windows 8 application?

My first challenge was to identify the current visual status of the application: I need, in fact, a different behavior according to the visual status. When the application is in “standard” mode I use a GridView to display all the posts: when the user taps on one of them, it should be opened inside the application; when the application, instead, is in snapped mode the GridView is replacted by a ListView: in this scenario when the user taps on one of the posts it should be opened inside Internet Explorer.

For this purpose WinRT features a class called ApplicationView, that is part of the Windows.UI.ViewManagement namespace. This class exposes, as a static object, the Value property, which type is ApplicationViewState: it’s an enumerable, that offers a value for each one of the available visual states (that are Snapped, Filled, FullScreenLandscape and FullScreenPortrait). The value of this property matches the current visual state of the application. This is exactly what I needed to manage the different behavior.

The second step is to find the WebBrowserTask corresponding in the WinRT world: please welcome the Launcher static class, that is part of the namespace Windows.System.Launcher. This classes exposes the method LaunchUriAsync, that does exactly what we need: it opens a new page in the Internet Explorer Metro application, according to the Uri that is passed as parameter.

Here is an example where we apply this code in the SelectionChanged event handler, that is raised every time the user taps on an item of a GridView or a ListView.

private void Selector_OnSelectionChanged(object sender, SelectionChangedEventArgs e)
{
    if (ApplicationView.Value == ApplicationViewState.Snapped)
    {
        Launcher.LaunchUriAsync(new Uri(e.AddedItems[0]));
    }
    else
    {
        Frame.Navigate(typeof (DetailPage), e.AddedItems[0]);
    }
}
Posted in Windows 8 | Tagged | 2 Comments

Include a support page in the Settings panel of a Windows 8 application

One of the requisites to pass the certification for a Windows 8 application is to provide a support page, where the user can find all the information needed to get in touch with the developer. This requirement is inherited directly from the Windows Phone world, even if, some time ago, this feature has turned from required to optional. Usually, in a Windows Phone application, developers provided a separate page: users are able to reach it using a button in the main view or in the application bar.

In Windows 8 applications we have a new way to manage this requirement, without having to create a separate page just to display some contact information: the Settings panel. This panel is displayed in the charm bar (that appears when the user moves the mouse at the right top corner of the screen) and it’s the ideal place where to insert all the stuff related to the settings of the application. It’s also a good position where to place the support page of our application.

Let’s see how to do this in a XAML / C# application.

Create the support page

To create the support page it’s enough to add a simple standard page to the project, where we’re going to place all the information to contact the developer: a website’s url, a mail address, a Twitter account, etc.

There’s nothing special to tell about this info page: it should be a standard XAML page, that uses the Basic Page template. While adding content to this page we have just to keep in mind that just a small portion of it (more precisely, the left side) will be displayed in the settings panel, so be careful aligning the controls un the correct way.

Attach the page to the settings panel

Now that we have a page to display, we have to “attach” it to the Settings panel, in order to allow users to access to it. To achieve this results we’re going to use a third party library available on Nuget and GitHub, called Callisto. This toolkit features a lot of useful controls for developing Windows 8 applications: one of them is the SettingsFlyout control, that exactly it our needs.

Which is the purpose of this control? Usually the settings panel is based on a primitive WinRT control called Popup: this control is based on a “light dismiss” logic and many Windows 8 controls are based on it. Basically, using this logic means that something is displayed on the screen and the user can dismiss it by simply tapping in an area outside of the control. The settings panel is a good example of this behavior: if you invoke it by using the charm bar and then you tap somewhere else in the screen, the settings panel is hided.

Let’s see how to use it: the first thing is to install Callisto in our project, just search for Callisto in Nuget and install the package that will be displayed in the results page.

The next step is to register in the application the event that is raised every time the user tap on the settings icon in the charm bar: when this event is raised, we’re going to set our command that will attach the setting page to the panel.

The event is called CommandsRequested and it’s available in the SettingsPane object; to use it, first, we have to get settings panel for the current view by calling the GetForCurrentView() method, like in the following example:

SettingsPane.GetForCurrentView().CommandsRequested += MainPage_CommandsRequested;

Now we have to manage the event handler (that in this example is called MainPage_CommandsRequested), where we are going to register a SettingsCommand, that is invoked when the user presses the settings icon in the charm bar.

The settings command accepts three important parameters:

  • the command id, that should be unique;
  • the label that is displayed in the Settings panel to access to our info page;
  • the handler that is invoked, where we are going to use the SettingsFlyout class that is available in the Callisto toolkit.

Let’s see the code first:

void MainPage_CommandsRequested(SettingsPane sender, SettingsPaneCommandsRequestedEventArgs args)
{
    SettingsCommand command = new SettingsCommand("Support", "Support", (x) =>
    {
        SettingsFlyout settings = new SettingsFlyout();
        settings.Background = new SolidColorBrush(Colors.White);
        settings.HeaderBrush = new SolidColorBrush(Color.FromArgb(255, 99, 4, 4));
        settings.Content = new InfoPage();
        settings.HeaderText =
            "Informazioni";
        settings.IsOpen = true;
    });

    args.Request.ApplicationCommands.Add(command);
}


The first step is to create an instance of the SettingsCommand: in this example Support is both the command id and the label that is displayed in the Settings pane. As I said earlier, the third parameter is the command that is effectively invoked when the command is issued: in this handler we’re going to create an instance of the SettingsFlyout control, that will “encapsulate” the info page we’ve created earlier and adapt it to be inserted in the settings panel.

The SettingsFlyout control has many properties that allow us to customize it: we can set the background color, the brush and the text of the header and so on; the most important one is the Content property, that defines the content of the panel. In this case, we’re simply going to create a new instance of the support page we’ve created in the beginning of this post (in my example, it’s called InfoPage).

The last two important things are to set the IsOpen property to true and then to add the command ApplicationCommands collection, that contains all the commands that are available in the Settings panel. We can access to this collection using the Request object, that is one of the properties of the SettingsPaneCommandRequestedEventArgs parameter of the handler.

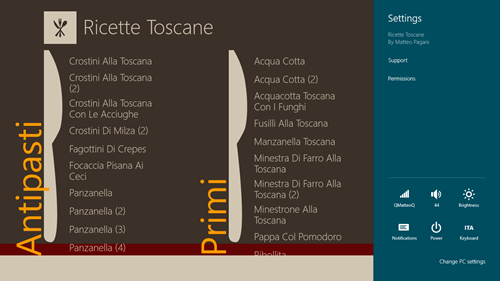
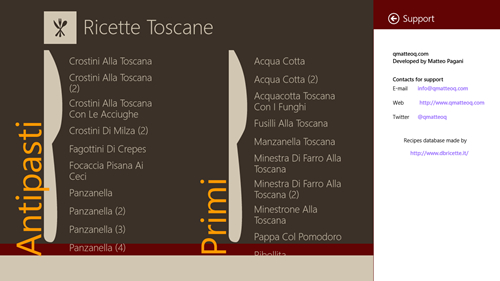
And.. we’re done! We can simply register the CommandsRequested handler when the application starts: the result is that, when the user will tap on the Settings icon in the charm bar, he will see an item called Support: clicking on it will display the support page with the light dismiss logic described before.

You can see the final result in the following images, while Support page sample application that will help you to implement what we’ve discussed in this post.

Screenshot (10)

Screenshot (13)

Posted in Windows 8 | Tagged | 2 Comments

Using SQLite in your Windows 8 Metro style applications

As a little surprise for developers, Windows 8 doesn’t come out with native database support. In the past months some SQLite portings came out, but none of the them was working really good. After the Windows Phone Summit (where Microsoft announced Windows Phone 8), the situation started to be more clear: SQLite will be the database officialy supported by Microsoft and SQLite will be officially released both for Windows 8 and Windows Phone 8. This way it’s likely to think that, as developers, we will be able to share not only the database but also the data access layer between the two platform: this will help us a lot porting our apps from one platform to the other.

Now SQLite’s branch for WinRT is available and we can start to use it to store the data of our applications, with the help of another library called sqlite-net, that provides LINQ based APIs to work with data, both with sync and async support.

In this post we’ll see how to start using SQLite in a XAML / C# application, how to create our first database and how to make some simple operations, like storing and reading data.

Adding SQLite to our Metro style app

The first step is to download from the official SQLite website the WinRT version: be careful that, since it’s a natice code library, you should get the specific version for the platform you’re going to support (x86 or x64). ARM is still not supported, but I expect it to be released soon.

For this example I’ve downloaded, from the Download page, the x86 version, which file name is  sqlite-dll-winrt-x86-3071300.zip

After you’ve downloaded it, you’ll have to extract the content somewhere and add the file sqlite3.dll to your project: be careful that, since the DLL it’s a native library that contains the SQLite engine (so it doesn’t provide any API to interact with it), you’ll simply have to copy it in the root of your project and make sure that the Build Action is set to Content.

Now that you have the engine you need something to interact with it: please welcome sqlite-net, a library available on NuGet and that supports WinRT, that provides data access APIs to interact with the database, using LINQ-based syntax.

Adding it is very simple: just right click on your project, choose Manage NuGet packages, search online for the package with name sqlite-net and install it. The package will add two classes in your project: SQLIite.cs (that provides sync access) and SQLIteAsync.cs (that provides, instead, asynchronous operations to interact with the database).

Now you’re ready to create your first database.

Create the database

The sqlite-net approach should be familiar to you if you’re a Windows Phone developer and you have already worked with SQL CE and native database support: we’ll have a class for every table that we want to create and we’re going to decorate our properties with some attributes, that will tell to the library how to generate them. We’ll use for this example a very simple class, that can be used to store a list of persons:

public class Person
{
    [PrimaryKey, AutoIncrement]
    public int Id { get; set; }

    [MaxLength(30)]
    public string Name { get; set; }

    [MaxLength(30)]
    public string Surname { get; set; }

}

In this example you can see some of the simple attributes you can use to decorate your classes:

  • PrimaryKey is used to specify that the column will be the primary key of the table.
  • AutoIncrement usually is used in couple with a primary key; when this option is enabled the value of this column will be a number that will be automatically incremented every time a new row is inserted in the table.
  • MaxLength can be used with string properties to specify the maximum number of chars that will be stored in the column.

After you’ve defined the tables, it’s time to create the database. Since WinRT relies as much as possible on an asynchrnous pattern, we’ll use the async version of sqlite-net.

private async void CreateDatabase()
{
    SQLiteAsyncConnection conn = new SQLiteAsyncConnection("people");
    await conn.CreateTableAsync<Person>();
}

The first step is to create a SQLiteAsynConnection object, that identifies the connection to the database, like in the example: the parameter passed to the constructor is the name of the file that will be created in the local storage. Then we call the CreateTableAsync<T> method for every table that we want to create, where T is the type of data that we’re going to store in it (in the example, every row will be an element of the Person class). Notice that the method returns a Task, so we can use the keyword await to perform the operation asyncrhonously.

Play with the data

Now that we have a database, we can have some fun by adding and reading some data. Both operations arew very simple and, in both case, we’ll need a SQLiteAsyncConnection object that points to the same database.

To insert data we use the InsertAsync method, that simply accepts as parameter an istance of the object we’re going to save. Obviously, the object’s type should match the table’s type. Here is an example:

private async void Button_Click_1(object sender, RoutedEventArgs e)
{
    SQLiteAsyncConnection conn = new SQLiteAsyncConnection("people");

    Person person = new Person
    {
        Name = "Matteo",
        Surname = "Pagani"
    };

    await conn.InsertAsync(person);
}

To query the data, instead, we can access directly to the table using the Table<T> object: it supports LINQ queries, so we can simply use LINQ to search for the data we need. Then, we can call the ToListAsync method to get a List<T> of objects that matches the specified query. In the following example we look in the table Person all the users which name is Matteo and we print the results in the Output Window.

private async void Button_Click_2(object sender, RoutedEventArgs e)
{
    SQLiteAsyncConnection conn = new SQLiteAsyncConnection("people");

    var query = conn.Table<Person>().Where(x => x.Name == "Matteo");
    var result = await query.ToListAsync();
    foreach (var item in result)
    {
        Debug.WriteLine(string.Format("{0}: {1} {2}", item.Id, item.Name, item.Surname));
    }
}

Where is my data?

If you want to take a look at your data, you can access to the path where Windows 8 stores the local storage of application. To find it, simply get the value of the property Windows.Storage.ApplicationData.Current.LocalFolder.Path. Once you have it, you’ll find in that folder a file with the same name that you’ve specified as parameter when you’ve created the SQLiteAsyncConnection object. If you want to open it, I suggest you to download and install an utility called SQLite Database Browser, that you can find at the website http://sqlitebrowser.sourceforge.net/.

With this utility you can open the database and explore it: you can see the tables, query the data and so on. Have fun!

Update: here you can download a sample project

Posted in Windows 8 | Tagged , , | 213 Comments