A lap around Windows Phone 8 SDK: file association – Part 1

One of the biggest limitations for Windows Phone developers was the impossibility to share data between applications. This wasn’t limited to third party apps, but also file types that are supported by native applications (just think about Office files) couldn’t be opened directly: the workaround was to open the file using the browser, this way if the file type was supported by the OS it was opened with the correct application. The biggest issue of this workaround is that it worked only if the file was available online: it didn’t work with files that were stored in the isolated storage.

It’s with a big applause that we welcome protocol and file association in Windows Phone 8, a feature that comes directly from Windows 8 and that allows your application to register for a specific protocol or file extension; this way other applications can simply launch a request to open a specific file or URL and the OS will take care of redirecting the operation to one of the available apps that has registered for that file type.

There are two ways to share data: by registering for a file association and for a protocol. The first feature allows an application to register for a specific file extension (for example, .log) : when someone tries to open a file with that extension, the file is passed to the application and copied to its local storage, so that he can interact with it. The second one, that we will cover in another blog post, can be used to register for a specific protocol (for example, log:/), so that an application can send text data to another application simply by calling that protocol.

What happens when a third party application tries to open a file? The OS scans for apps that, in the manifest file, has registered to support that file type: if no apps are found, the user is prompted to go to the Store to download an application that is able to manage that kind of file. If multiple apps that are able to manage the same extension are installed on the device, the user is asked which one he wants to use; instead, if there’s only one application available it’s directly opened.

In this tutorial we’ll focus on file association: we’ll deal with the protocol association in another post. In the example we’re going to use for this tutorial we’ll create two separate Windows Phone 8 apps: the first one will be called “the launcher” and it will be the app that will launch the file request, that will be processed by “the reader” app, that will be the app that will “listen” for a specific type extension and that will receive the files.  We’ll register for the .log extension and we’ll use it to share a file with some text inside between the two applications.

The “launcher” app: how to open a file

In the launcher app we’re going to accomplish two tasks: the first one is to create a log file, which will be a simple text file. The second one is to “launch” that file, so that the reader application can use it. Let’s start creating the log file: for this step we’re going to use a class that adds two simple extension methods to work with strings. The first one is called WriteToFile and can be used to write a string into a file in the local storage; the second one is called ReadFromFile and does the opposite task: reads a text file from the local storage and return it as a string.

Let’s start to create a class that will contain our extension methods: to do that just create a new class (by right clicking on your project and choosing Add new file) and mark it as static. In this post we’ll see the WriteToFile method, since it’s the only one we’re going to use in the launcher app.

namespace ShareData.Launcher.Helpers
{
    public static class FileExtensions
    {   
        public static async Task WriteToFile(this string contents, string fileName, StorageFolder folder = null)
        {
            folder = folder ?? ApplicationData.Current.LocalFolder;
            var file = await folder.CreateFileAsync(
                fileName,
                CreationCollisionOption.ReplaceExisting);
            using (var fs = await file.OpenAsync(FileAccessMode.ReadWrite))
            {
                using (var outStream = fs.GetOutputStreamAt(0))
                {
                    using (var dataWriter = new DataWriter(outStream))
                    {
                        if (contents != null)
                            dataWriter.WriteString(contents);

                        await dataWriter.StoreAsync();
                        dataWriter.DetachStream();
                    }

                    await outStream.FlushAsync();
                }
            }
        }
    }
}

The method takes a string and saves it into a file in the local storage, which name is specified as parameter. The method accepts also another parameter, which type is StorageFolder (that identifies a folder in the local storage): we can use it in case we want to store the file in a specific folder. If you don’t set this parameter, the file will be created in the storage’s root.

This method uses the standard WinRT APIs to create the file in the storage and uses an OutputStream and the DataWriter class to write the content of the string in the class.

The next step is to install the Microsoft.Bcl.Async package from NuGet, that we’ve learned to use in this post: the purpose is to use the async WebClient methods to download the content of a RSS feed and to save it into a file.

Now let’s work on the UI: we’re simply going to add two buttons in the MainPage.xaml, one to download the XML and write the file, the other one to “open” it.

<Grid x:Name="ContentPanel" Grid.Row="1" Margin="12,0,12,0">
    <StackPanel>
        <Button Content="Create file" Click="OnCreateFileButtonClicked" />
        <Button Content="Open file" Click="OnOpenFileButtonClicked" />
    </StackPanel>
</Grid>

Thanks to the extension method we’ve created and to the WebClient extension methods we’ve added by installing the Microsoft.Bcl.Async package it’s very easy to accomplish our task, that is downloading a XML and storing into a file with .log extension:

private async void OnCreateFileButtonClicked(object sender, RoutedEventArgs e)
{
    WebClient client = new WebClient();
    string result = await client.DownloadStringTaskAsync("http://feeds.feedburner.com/qmatteoq_eng");

    await result.WriteToFile("rss.log");
}

We simply download the RSS using the DownloadStringTaskAsync method (in this example, we download the RSS feed of this blog) and we save it into a file called rss.log, that is placed in the root of the local storage.

Now it’s time to open the file:

private async void OnOpenFileButtonClicked(object sender, RoutedEventArgs e)
{
    StorageFile file = await ApplicationData.Current.LocalFolder.GetFileAsync("rss.log");
    Windows.System.Launcher.LaunchFileAsync(file);
}

Also in this case the operation is really easy: we get a reference to the file (using the GetFileAsync method) and then we open it using the LaunchFileAsync method of the Launcher class. What’s going to happen? At this stage of the tutorial, you will be prompted with a message that will tell you that you don’t have any  app that is able to open .log files and you will be asked if you want to look for it in the Store. For the moment, just ignore the message: in the following post we’re going to create the reader application, that will register the .log extension and that will be able to open our file.

If you want to give a try to this feature until I publish the next post, try to rename the file saved by the application to rss.txt, by simply changing the name that is passed both to the result.WriteToFile() and LocalFolder.GetFileAsync() methods. Since .txt is an extension registered by the operating system, the file will be opened using Word and you’ll be able to read the content of the XML file.

To be continued

In the next post we’re going to developer our own reader app, that will be able to intercept and open the file.log file we’ve created in this post. Stay tuned!

Posted in Windows Phone | Tagged | Leave a comment

Async pack for Visual Studio 2012: why it’s useful also for Windows Phone 8 projects

Microsoft has recently released the Async Pack for Visual Studio 2012: it’s a very helpful package and it’s the successor of the old Async CTP that was available for Visual Studio 2010. Its purpose is to add support to the new asynchronous pattern introduced in C# 5 (based on the async and await keywords) also to “old” technologies that, since are still based on C# 4, couldn’t make use of it. Some example of these technologies are Silverlight or Windows Phone 7: basically, we’re talking about all the stuff that relies on .NET Framework 4, since the new .NET Framework 4.5 (that has been shipped with Windows 8) is based on C# 5.

Installing it is very easy: you simply have to use NuGet, by right clicking on the project and choosing Manage Nuget packages. First you have to change the filter that is applied by default: since the async package is still in beta, you have to change the default filter at the top of the window from Stable only to Include prerelease. After that, you can search for the keyword Bcl.Async and install the Async for .NET Framework 4, Silverlight 4 and 5 and Windows Phone 7.5 package. Automatically NuGet will resolve all the references and it will install also the Microsoft.Bcl package for you.

image

But why this package should be interesting also for developing Windows Phone 8 applications? Windows Phone 8 is a new technology, based on a subset of the Windows Runtime, so the async and await support is built in.

The answer is that, due to maintain compatibility with the old platform (that didn’t have async and await support), some old classes doesn’t offer a way to use them with the new pattern. Take the WebClient class for example, which is very popular to make network operations (like downloading a file). Unlike the other WinRT APIs (like the ones to work with storage or sensors), it still relies on the old callback pattern: you register for an event handler that is invoked when the operation is finished, you launch the network operation and, inside the event handler (that is the callback), you manage all the operations that should be done with the result (like storing the file in the local storage or displaying it).

Here is an example:

WebClient client = new WebClient();
client.DownloadStringCompleted += (obj, args) =>
                                      {
                                          if (args.Error == null)
                                          {
                                              MessageBox.Show(args.Result);
                                          }
                                      };
client.DownloadStringAsync(new Uri("http://wp.qmatteoq.com"));

We download the HTML content of the page of this blog and, when the operation is completed, if no errors have occurred, we display it using a MessageBox.

This approach is not so easy to write and understand like with the async and await keywords, basically because the code we wrote is not sequential: the code that is written after the DownloadStringAsync method is executed right after we have issued the network operation but, at a certain point, the execution will stop and the application will start running through the DownloadStringCompleted event handler.

Plus, probably we’ll have some sort of “spaghetti” code: we’re using the callback approach to manage network operations but, for example, we’ll have to use the async and await pattern if we want to use the new storage APIs to save the HTML in a file in the local storage.

Here comes the Async pack: other than adding support to async and await (that is not needed, since Windows Runtime for Windows Phone already supports it) it adds a bunch of extension methods, that add to many “old style” classes new methods to work with Task objects and the new async pattern.

Some examples of classes that can take benefit of these extension methods are WebClient, HttpWebRequest and Stream. This way we change the previous example to use the new approach:

private async void OnDownloadAsync(object sender, RoutedEventArgs e)
{
    WebClient client = new WebClient();
    string result = await client.DownloadStringTaskAsync("http://wp.qmatteoq.com");
    MessageBox.Show(result);
}

Or, for example, we can start a network request using the HttpWebRequest class in a much simpler way:

private async void OnDownloadAsync(object sender, RoutedEventArgs e)
{
    HttpWebRequest request = HttpWebRequest.CreateHttp("http://wp.qmatteoq.com");
    HttpWebResponse webResponse = await request.GetResponseAsync() as HttpWebResponse;
    MessageBox.Show(webResponse.StatusDescription);
}

Or, in the end, we can use the Stream extension methods to get the content of the previous HttpWebRequest example:

private async void OnDownloadAsync(object sender, RoutedEventArgs e)
{
    HttpWebRequest request = HttpWebRequest.CreateHttp("http://wp.qmatteoq.com");
    HttpWebResponse webResponse = await request.GetResponseAsync() as HttpWebResponse;
    Stream responseStream = webResponse.GetResponseStream();

    using (StreamReader reader=new StreamReader(responseStream))
    {
        string content = await reader.ReadToEndAsync();
        MessageBox.Show(content);
    }
}

For all of the reasons I’ve explained in this post, I strongly suggest you to add the Async targeting pack to every Windows Phone 8 project you’re going to develop. Have fun!

Posted in Windows Phone | Tagged , | 3 Comments

Unit testing in Windows Phone 8 – Asynchronous operations and mocking

One of the most common scenarios to test are asynchronous operations: WinRT is heavily based on async methods, both in Windows 8 and in Windows Phone 8. Plus, thanks to the new async and await keywords, it’s now easier for developers to manage correctly this pattern.

Which is the correct way to test async methods? If you try to write a test in the same way we did in the previous post, you’ll see that it doesn’t work: the test will always pass, regardless of the result. The reason is that the unit test runner doesn’t know that you are testing an asynchronous operation, so it doesn’t wait for it to be finished before evaluating the assert.

In this post we’ll see which is the correct way to manage an asynchronous test. But, first, we’ll have to create some code to use in our tests. Let’s start!

The asynchronous operation

To do our test we’re going to use the WebClient class, which is the simplest class available in Windows Phone to perform network operations, like downloading or uploading a file. Unlike in Windows 8 (that doesn’t have the WebClient class, but a similar one called HttpClient ), the WebClient only supports asynchronous operations in the old fashion way: a method to launch the operation and an event that is raised when the operation is finished and we are ready to parse the result. This approach is still supported by the Unit Test Framework but we prefer to use and test the new one, based on the async and await keywords.

To accomplish this task, we’re going to install the Microsoft.Bcl.Async library from NuGet, that adds async methods to standard Windows Phone classes. To see this package you have to choose the option Include prerelease in the dropdown placed at the top of the windows. The package, in fact, is still in beta and you won’t be able to see it with the default configuration. This way, when we use the WebClient, we have some new methods that contain the keyword Task that return a Task, so that they can be used with the await keyword. In our example we’re going to use the DownloadStringTaskAsync method, which returns a string with the content of the response. We’re going to dig deeper about this library in another post.

Here is a simple  test that executes this method and verifies that the returned content’s length is equal to 0.

[TestMethod]
public async void AsyncMethod()
{
    WebClient client = new WebClient();
    string s = await client.DownloadStringTaskAsync("http://www.qmatteoq.com");
    Assert.IsTrue(s.Length == 0);
}

I’ve intentionally created this test to fail: in fact, since the DownloadStringTaskAsync method returns the HTML of my blog’s home page, the result’s length will always be greater than 0.

Run the application and.. the test will pass! If you have the debugger attached to the process, you’ll notice that first the test will pass and then, later, you’ll get an AssertFailedException on the Assert.IsTrue method. This happens because the unit test runner application doesn’t wait that the DownloadStringTaskAsync operation is completed: since the method ends without exceptions, the unit test runner marks it as passed. When the operation is really completed, the assert is executed and it fails: but it’s too late, the test has already been marked as valid.

We need to make three changes to allow the unit test runner to properly run our asynchronous test. The first one is to change our test class, so that it inherits from WorkItemTest class, that is part of the Microsoft.Phone.Testing namespace. The second step is to mark the test as asynchronous, by using the [Asynchronous] attribute. The third and last one is to tell to the unit test runner when the test is really finished: to do this we call the EnqueueTestComplete() method (which is inherited from the WorkItemTest class) when the async operation is ended. Here is how will look our final test method:

[TestClass]
public class SimpleUnitTest: WorkItemTest
{
    [TestMethod]
    [Asynchronous]
    public async void AsyncMethod()
    {
        WebClient client = new WebClient();
        string s = await client.DownloadStringTaskAsync("http://www.qmatteoq.com");
        Assert.IsTrue(s.Length == 0);
        EnqueueTestComplete();
    }
}

Launch again the application: this time you’ll see that the test correctly fails, because the unit test runner will wait until the EnqueueTestComplete method is called before considering the test method finished.

The couple [Asynchronous] attribute and EnqueueTestComplete method can be used with any asynchronous pattern, not just the new one. Here is, for example, how can we use the same approach to test the callback based method of the WebClient class.

[TestMethod]
[Asynchronous]
public void AsyncMethod()
{
    WebClient client = new WebClient();
    client.DownloadStringCompleted += (obj, args) =>
                                          {
                                              Assert.IsTrue(args.Result.Length == 0);
                                              EnqueueTestComplete();
                                          };
    client.DownloadStringAsync(new Uri("http://www.qmatteoq.com"));
}

The result will be exactly the same: the test will correctly fail, since the length of the downloaded content is greater than 0.

UPDATE: As Anders. a blog’s reader, correctly pointed out, the test we have just written it’s not a unit test, but an integration test. The reason is that, to execute on the test, we rely on external dependencies that are available just in a real enviroment. In this example, we’re talking about the network connection; another example of integration test would involve, for example, writing a file in the local storage or accessing to the GPS to get the current position. In the next chapter we’ll see how, with the help of mocking, we can turn an integration test into a unit test.

Mocking: what is it?

Sometimes you need to test logic that depends on other classes and other methods, that perform various operations and that can affect the final result of test. But, what you need to test, in the end, is that the logic of your method is correct, without bothering about all the dependencies and external factors. Let’s see an example to better explain the concept.

Let’s say you have a class (with the corresponding interface) that simply exposes a method that uses the WebClient class to retrieve the content of a page and returns it:

public interface INetworkService
{
    Task<string> GetContent(string url);
}

public class NetworkService: INetworkService
{
    public async Task<string> GetContent(string url)
    {
        WebClient client = new WebClient();
        string content = await client.DownloadStringTaskAsync(url);
        return content;
    } 
}

Your real application has another class that uses the NetworkService to get the length of a page’s content:

public class DataProvider
{
    private readonly INetworkService networkService;

    public DataProvider(INetworkService networkService)
    {
        this.networkService = networkService;
    }

    public async Task<int> GetLength(string url)
    {
        string content = await networkService.GetContent(url);
        return content.Length;
    }
}

This means, that, for example, in the MainPage of your application you have some code that uses the DataProvider to issue a network request and get the content’s length, like in the following example:

private async void Button_Click_1(object sender, RoutedEventArgs e)
{
    INetworkService networkService = new NetworkService();
    DataProvider provider = new DataProvider(networkService);

    int length = await provider.GetLength("http://www.qmatteoq.com");

    MessageBox.Show(length.ToString());
}

In a real application you would have used the dependency injection approach, but since we’re working on an example I won’t make the scenario too complex. Our goal is to test the GetLength method of the DataProvider class: this method relies on another class, NetworkService, to perform the network request. We could simply write a test that performs a real web request and check if the length of the response is greater than zero, but in this case the test would be out of scope: the fact that the network request can fail (for example, because the Internet connection is missing) doesn’t mean that the GetLength method is wrong. Here comes the concept of mock: mocking means creating a fake class, that exposes the same properties and methods of the original class, but that we can instruct to specify what a method should do and should return without effetely executing it.

In our example, our goal is to create a mock of the NetworkService class, so that we can simulate a real execution of the GetContent method and return a fake content, that will be processed by the GetLength method of the DataProvider class. For this purpose we’re going to use a library called Moq, that is available on NuGet but that, for the moment, we’re going to download it from the official website. The reason is that Moq doesn’t officially support Windows Phone, so NuGet would abort the installation process because it doesn’t find a supported platform. Instead, if you download the library from the website, you’ll find a Silverlight version that works also on Windows Phone: simply extract the file downloaded from the website, extract the file called Moq.Silverlight.dll in a folder and add it to your project using the Add reference option. You’ll get a warning that the Silverlight library can be not fully compatible with the project: simply click Yes and the library will be added.

Let’s take a look at the code of the unit test method that checks if the GetLength method of the DataProvider class works fine:

[TestMethod]
public async void ComplexTest()
{
    TaskCompletionSource<string> tcs = new TaskCompletionSource<string>();
    tcs.SetResult("done");

    Mock<INetworkService> mock = new Mock<INetworkService>();
    mock.Setup(x => x.GetContent(It.IsAny<string>())).Returns(tcs.Task);

    DataProvider provider = new DataProvider(mock.Object);
    int length = await provider.GetLength("http://www.qmatteoq.com");

    Assert.IsTrue(length > 0);
}

Using Moq is very simple: first we create a mock version of the class which behavior we need to fake, that is the NetworkService class. Then, using the Setup method, we tell to the library which is the method we want to simulate and, using the Returns statement, which is the result that the method should return. The parameter of the Setup method is passed using a lambda expression: in our example, we set up a fake call of the GetContent method. Notice the use of the method It.IsAny<T>, that is used to generate a fake parameter of the request. T is the parameter’s type: in our example this type is equal to string, since the parameter is the URL of the website.

To manage the Returns statement we need a little workaround, since GetContent is an asynchronous method. To avoid that the Assert is evaluated before the method is actually finished, we need to prepare first the result of the GetContent method using the TaskCompletionSource class. In this example, we want that the GetContent method returns the string “done”, so we create a TaskCompletionSource<string> object and we pass the string to the SetResult method.

Now we are ready to simulate the GetContent method: we pass to the Returns statement the Task object that is returned by the TaskCompletionSource object.

In the end we can use the DataProvider class like we would do in the real application: the only difference is that, instead of passing to the constructor a real NetworkService instance, we pass the mocked object, that can be accessed using the Object property of the Mock object.

If you execute the test you’ll see that it will successfully pass. If you place a breakpoint and you debug the test step by step you’ll see that our mocked object has worked correctly: in our case, the length of the content will be 4, since the string returned by the GetContent method will be “done”, like we specified with the Returns statement.

Just a note! You can notice that, this time, we didn’t mark the test with the Asynchronous attribute and we didn’t call the EnqueueTestComplete method: the reason is that, since we have created a mock of the GetContent operation, the method is not asynchronous anymore, since the result is immediately returned.

In the end

I hope you had fun playing with unit tests in Windows Phone 8!

Posted in Windows Phone | Tagged , | 12 Comments

Unit testing in Windows Phone 8 – The basics

Unit testing in Windows Phone has never been really supported by Microsoft: the only semi-official way to do unit tests in Windows Phone 7 is using an adaptation of the Silverlight Unit Test Framework made by Jeff Wilcox. This library is able to render a Windows Phone application, that is capable of running the unit tests included in the project. The downside of this approach is that you have to use a dedicated Windows Phone app to run the tests, instead of using a built-in tool like Resharper. The biggest advantage, instead, is that unit tests are executed into a real environment, so it’s easy to write integration tests that makes use, for example, of the storage or of a real Internet connection.

Since unit tests are an important part of every project, especially the most complex ones, Microsoft has now adapted the Silverlight Unit Test Framework to Windows Phone 8, dropping the Silverlight part of the name and adding it as a part of the new Windows Phone 8 toolkit. Let’s see how to use it, how to run simple tests and, in the next post, how to face some more complicated scenarios (like mocking and dealing with async methods).

Preparing the environment

As I anticipated you, the tests are executed in a separate Windows Phone application: for this reason, you’ll have to add another Windows Phone project to your solution. Once you’ve done it, you can install the Windows Phone toolkit from NuGet and the unit testing framework: now we are ready to set up the application.

The first thing is to open the code behind file of the MainPage, that is MainPage.xaml.cs and add in the constructor, right below the InitializeComponent() method, the following code:

public MainPage()
{
    InitializeComponent();
    this.Content = UnitTestSystem.CreateTestPage();
}

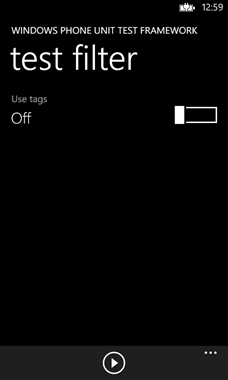
This way when the application is launched the unit test runner is displayed: you can see it by yourself by launching the application in the emulator. The first screen will ask you if you want to use tags or not (we’ll see later which is their purpose): if you press the Play button in the application bar you’ll be redirected to the main window of the unit test runner, even if you won’t see no tests at the moment since we haven’t added one yet.

unit1

The next step is to create one or more classes that will hold our tests: in a real scenario we would create a unit test class for every real class that we need to test. For this example, we’re simply going to create a single class: we can place it everywhere we want but, to keep the structure of the project organized, we will add a new folder called UnitTests and we will add the new class there: in my example, I’ve called it SimpleUnitTest. To add it, simply right click on the new folder, choose Add – New item and add a Class file.

The first thing to do is to add the namespace Microsoft.VisualStudio.TestTools.UnitTesting at the top of your class: this way we can access to the attributes and classes needed to test our code. The second step is to mark the entire class with the attribute [TestClass]: this way we’ll tell to the application that this class contains unit tests that should be processed and executed.

Now let’s add a simple unit test (to be honest, it’s more stupid than simple Smile): the purpose is just to make you comfortable with the basics.

[TestClass]
public class SimpleUnitTest
{
    [TestMethod]
    public void SimpleTest()
    {
        int a = 1;
        int b = 2;

        int c = a + b;

        Assert.IsTrue(c == 3);
    }
}

Notice the [TestMethod] attribute that we used to mark the SimpleTest method: with this attribute we’re telling to the application that this method actually contains a unit test that should be executed. The test is really stupid: we sum two numbers and we check that the sum is correct, using the Assert class, which contains different methods that can be used to check the results of our test. In this case, we need to test a boolean condition, so we can use the IsTrue method. Other examples of methods are IsNotNull (to check that a object actually has a value) or IsInstanceOfType (to check if the object’s type is the one we expect).

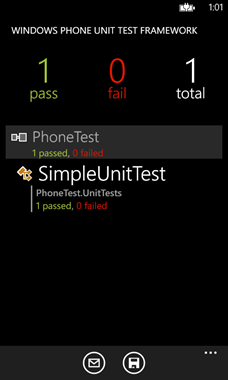
Run the application and launch the tests: this time you’ll see the test run and you’ll be prompted with the results. Obviously, in this case, the test will pass, since 1+2 = 3.

unit2

Let’s test a fail case: change the condition that is tested in a way that is not true anymore, like in the example:

[TestClass]
public class SimpleUnitTest
{
    [TestMethod]
    public void SimpleTest()
    {
        int a = 1;
        int b = 2;

        int c = a + b;

        Assert.IsTrue(c == 4);
    }
}

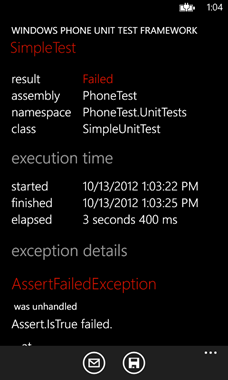
Run again the application: this time you’ll see that test is failed. Clicking on the test will let you see the details and why it failed: in this case, you’ll clearly understand that the Assert.IsTrue operation is failed.

unit3

Using tags

Sometimes you don’t want to run all the tests that are available in your classes, but just a subsets: this is what tags are for. To use them, you have to add to your test class the namespace Microsoft.Phone.Testing, which will allow you to decorate a test method with the Tag attribute, followed by a keyword. To see this feature in action, let’s add another test method: we’ll set the Tag attribute just for one of them.

[TestClass]
public class SimpleUnitTest
{  
    [Tag("SimpleTests")]
    [TestMethod]
    public void SimpleTest()
    {
        int a = 1;
        int b = 2;

        int c = a + b;

        Assert.IsTrue(c == 3);
    }

    [TestMethod]
    public void SimpleTest2()
    {
        int a = 3;
        int b = 1;

        int c = a + b;

        Assert.IsTrue(c == 4);
    }
}

Now run again the application and this time, in the first screen, trigger the Use tags switch to On. You will be prompted to specify a keyword that will be used by the application to determine which test run: insert the keyword SimpleTests (which is the tag we’ve set for the test method called SimpleTest) and press the Play button. You’ll see that, despite the fact you have two test methods in your class, only the first one will be executed.

Tagging is a great way to group unit tests so that, if you need to test just a specific class or feature, you don’t have to go through all the unit tests.

Debugging

If a test fails and you don’t know, it’s really easy to debug it: since, when you launch the unit test runner from Visual Studio, you are launching a standard Windows Phone application, you can simply set breakpoints in your test methods: they will be hit when the tests are executed and you can step into the code to see what’s going on.

Asynchronous tests, mocking and a lot more

In the next post we’ll cover some advanced but quite common scenarios, like mocking and asynchronous method testing. Keep up the good work meanwhile!

Posted in Windows Phone | Tagged , | 8 Comments

Azure Mobile Services for Windows Phone 8

During the BUILD conference, right after the announcement of the public release of the Windows Phone 8 SDK, Microsoft has also announced, as expected, that Azure Mobile Services, that we’ve learned to use in the previous posts, are now compatible with Windows Phone 8.

Do you remember the tricky procedure that we had to implement in this post to manually interact with the server? If you’re going to develop an application for Windows Phone 8 you can forget it, since now the same great SDK we used to develop a Windows Store app is now available also for mobile. This means that we can use the same exact APIs and classes we’ve seen in this post, without having to make HTTP requests to the server and manually parsing the JSON response.

The approach is exact the same: create an instance of the MobileServiceClient class (passing your service’s address and the secret key) and start doing operations using the available methods.

The only bad news? If your application is targeting Windows Phone 7, you still have to go with the manual approach, since the new SDK is based on WinRT and it’s compatible just with Windows Phone 8.

You can download the SDK from the following link: https://go.microsoft.com/fwLink/?LinkID=268375&clcid=0x409

Posted in Windows Phone | Tagged , | 3 Comments