First steps with Caliburn Micro in Windows Phone 8 – Messaging

When you develop an application using MVVM one of the most frequent scenarios is the communication between different view models: for example, you need to exchange data between two view models or you need that, as a consequence of an action in a page, something should happen in another page. In MVVM application the answer is messaging! All the MVVM toolkits offer a messenger class: you can think of it like a postman, that is able to dispatch and to process messages that are exchanged between view models.

UPDATE: since many of you have asked, I’ve updated the post to explain how to manage communications also between a View and a ViewModel

The message is represented by a simple class: it can have one or more properties, where you can store the data that you need to pass between the view models. Using messaging, usually, means to apply the following flow:

  • A view model prepares a message, by creating a new instance of the class that represents it and then send it using the messenger.
  • One or more view models can subscribe to receive that type of message: in that case, they are notified every time another view model sends that type of message and they can act, to process it and to do some operations.

Let’s see how this is implemented in Caliburn Micro. The scenario we’re going to use for our sample is the following: we have two views, each one with its view model. The second page has a button to send a message, that contains a name: when the button is pressed, the message with the name is passed to the first view model, so that it can be displayed in the first page.

The first step is to setup the project: please follow the steps described in all the previous tutorials to create the bootstrapper, the two pages and the two view models and to connect all of them together.

Before taking care of the messaging stuff, let’s prepare the needed infrastructure to make the app working. The first thing is to add, in the first page, a TextBox and a Button: the first one will be used to show the information passed by the other page, the second one will be used to navigate to the second page. Open the main page (usually the MainPage.xaml file) and add the following XAML in the Grid labeled ContentPanel:

<StackPanel>
    <TextBox x:Name="Name" />
    <Button Content="Go to page 2" x:Name="GoToPage2" />
</StackPanel>

Again, we are using the standard Caliburn naming conventions: the TextBox control will be bound with a property called Name in the ViewModel, while the button, when clicked, will execute the GoToPage2 method defined in the ViewModel.

And here’s our ViewModel:

public class MainPageViewModel: Screen
{
    private string name;

    public string Name
    {
        get { return name; }
        set
        {
            name = value;
            NotifyOfPropertyChange(() => Name);
        }
    }

    public MainPageViewModel(INavigationService navigationService)
    {
        this.navigationService = navigationService;
    }

    public void GoToPage2()
    {
        navigationService.UriFor<SecondPageViewModel>().Navigate();
    }
}

There isn’t too much to say about it: it has a Name property, which type is string, and it holds a reference to the Caliburn’s navigation service, which is used in the GoToPage2 method to redirect the user to the second page of the application. Now let’s see the XAML inside the ContentPanel of the second page, that is very simple too:

<StackPanel>
    <Button Content="Send message" x:Name="SendMessage" />
</StackPanel>

The page contains a button, that is linked to the method SendMessage that is declared in the ViewModel. Let’s take a look at the ViewModel of the second page, that is much more interesting because we introduce the classes needed to exchange messages:


public class SecondPageViewModel: Screen
{
    private readonly IEventAggregator eventAggregator;

    public SecondPageViewModel(IEventAggregator eventAggregator)
    {
        this.eventAggregator = eventAggregator;
    }

    public void SendMessage()
    {
        eventAggregator.Publish(new SampleMessage("Matteo"));
    }
}

The class that is used to manage all the messaging stuff in Caliburn is called EventAggregator and, as for the NavigationService, it’s built in in the framework: this means that it’s enough to add a parameter in the constructor of your ViewModel which type is IEventAggregator to automatically have a reference to the object. Sending a message is really simple: you call the Publish method passing, as a parameter, the object that represents the message you want to send. As I’ve already told you before, the message is a simple class, that can hold one or more properties. Here is an example of the SampleMessage class:

public class SampleMessage
{
    public string Name { get; set; }

    public SampleMessage(string name)
    {
        Name = name;
    }
}

Nothing special to say about: it’s a class with a property called Name. In the constructor, we allow the developer to set a value for this property simply by passing it as a parameter. The result is that, in the previous sample, we use the EventAggregator to publish a message that contains the value Matteo in the Name property.

Ok, the EventAggregator, that is our postman, has sent the message. How can the ViewModel of the first page receive it? We need to do some changes:

public class MainPageViewModel: Screen, IHandle<SampleMessage>
{
    private readonly IEventAggregator eventAggregator;
    private readonly INavigationService navigationService;
    private string name;

    public string Name
    {
        get { return name; }
        set
        {
            name = value;
            NotifyOfPropertyChange(() => Name);
        }
    }

    public MainPageViewModel(IEventAggregator eventAggregator, INavigationService navigationService)
    {
        this.eventAggregator = eventAggregator;
        this.navigationService = navigationService;

        eventAggregator.Subscribe(this);
    }

    public void GoToPage2()
    {
        navigationService.UriFor<SecondPageViewModel>().Navigate();
    }

    public void Handle(SampleMessage message)
    {
        Name = message.Name;
    }
}

The first step is to inherit our ViewModel from the IHandle<T> class, that is part of the Caliburn toolkit and that it’s been created specifically for messaging purposes. When a ViewModel inherits from IHandle<T>, we say that the ViewModel will be able to receive messages which type is T. In our sample, since the SecondPageViewModel class sends a message which type is SampleMessage, we make the MainPageViewModel class to inherit from IHandle<SampleMessage>.

When we inherit from this interface, we are forced to implement in the ViewModel the Handle method, that contains as parameter the message that has been received. As you can see, dealing with messages is really simple: we simply need to include in the Handle method the code that we want to execute when the message is received. In this sample, we set the Name property of the ViewModel with the value of the Name property that comes with the message.

There’s another important thing to do to get messages working: we need to tell to the ViewModel that we want to subscribe to receive messages. For this reason, we need a reference to the IEventAggregator class also in the view model that will receive the message: we do it in the constructor, as usual, and, once we have it, we call the Subscribe method passing a reference to the ViewModel itself (we do this by passing the value this).

And we’re done! Now if we launch the application, we go to the second page, we press the Send message button and we go back to the first page, we’ll see that in the TextBox the string Matteo will be displayed.

Communications between the View and the ViewModel

In some cases you may need to exchange data between the view and the view model, for example to manage animations or events that can’t be subscribed using binding. The approach to do that is exactly the same we’ve just seen: the only difference is that we need a workaround to get access to the EventAggregator, since we can’t put a parameter which type is IEventAggregator in the constructor of the page: Caliburn Micro won’t be able to resolve it and will raise an exception. First we need to apply a change to the bootstrapper, to make the PhoneContainer object (that is the used to register and resolve classes in the application) a public property, so that it can be accessed also from other classes:

public class Bootstrapper : PhoneBootstrapper
{
    public  PhoneContainer container { get; set; }

    protected override void Configure()
    {
        container = new PhoneContainer();

        container.RegisterPhoneServices(RootFrame);
        container.PerRequest<MainPageViewModel>();
        AddCustomConventions();
    }

    static void AddCustomConventions()
    {
        //ellided  
    }

    protected override object GetInstance(Type service, string key)
    {
        return container.GetInstance(service, key);
    }

    protected override IEnumerable<object> GetAllInstances(Type service)
    {
        return container.GetAllInstances(service);
    }

    protected override void BuildUp(object instance)
    {
        container.BuildUp(instance);
    }
}


Then we need, in the code behind of the page, to get a reference to the container:

private IEventAggregator eventAggregator;

// Constructor
public MainPage()
{
    InitializeComponent();

    Bootstrapper bootstrapper = Application.Current.Resources["bootstrapper"] as Bootstrapper;

    IEventAggregator eventAggregator =
        bootstrapper.container.GetAllInstances(typeof (IEventAggregator)).FirstOrDefault() as IEventAggregator;

    this.eventAggregator = eventAggregator;

    eventAggregator.Subscribe(this);
}

First we get a reference to the bootstrapper: since it’s declared as a global resource, we can access to it with its key by using the Application.Current.Resources collection. Then, thanks to the modify we did before in the bootstrapper, we are able to access to the container and, using the GetAllInstances method, we get a reference to the EventAggregator class that has been automatically registered by Caliburn Micro at startup. We need to specify, as parameter of the method, which is the type of the class we want to get a reference, in this case typeof(IEventAggregator). Since there’s just one EventAggregator registered in the application, this collection will always contain just one element: we take it using the FirstOrDefault() LINQ operation.

Now that we have a reference to the EventAggregator class, we can use the same approach we’ve seen before for view models. If we want to receive a message, we have to call the Subscribe() method and we need to inherit our page from the IHandle<T> class, where T is the message we need to manage. By implementing this interface we’ll have, also in the view, to implement the Handle method, that receives the message as parameter. Here is an example:

public partial class MainPage : PhoneApplicationPage, IHandle<SampleMessage>
{
    private IEventAggregator eventAggregator;

    // Constructor
    public MainPage()
    {
        InitializeComponent();

        Bootstrapper bootstrapper = Application.Current.Resources["bootstrapper"] as Bootstrapper;

        IEventAggregator eventAggregator =
            bootstrapper.container.GetAllInstances(typeof (IEventAggregator)).FirstOrDefault() as IEventAggregator;

        this.eventAggregator = eventAggregator;

        eventAggregator.Subscribe(this);
    }

    public void Handle(SampleMessage message)
    {
        MessageBox.Show(message.Name);
    }

}

In case, instead, we want to send a message we call the Publish method, passing the object that represents the message to send:

public partial class MainPage : PhoneApplicationPage
{
    private IEventAggregator eventAggregator;

    // Constructor
    public MainPage()
    {
        InitializeComponent();

        Bootstrapper bootstrapper = Application.Current.Resources["bootstrapper"] as Bootstrapper;

        IEventAggregator eventAggregator =
            bootstrapper.container.GetAllInstances(typeof (IEventAggregator)).FirstOrDefault() as IEventAggregator;

        this.eventAggregator = eventAggregator;

        eventAggregator.Subscribe(this);
    }

    private void OnSendOtherMessageClicked(object sender, RoutedEventArgs e)
    {
        eventAggregator.Publish(new SampleMessage("Matteo"));
    }
}

In this sample we’ve created an event handler to manage the Click event of a button: when the user taps on it the message is sent directly from the View. Obviously, this is just a sample, in a real scenario is not useful: it would be better to create a method in the ViewModel and connect it to the button using the Caliburn naming convention. But there are some events that can’t be connected to a command using binding: in this case, using messages is a good alternative.

Keep visiting this blog because we’re not done yet Smile More posts about Caliburn Micro and Windows Phone are coming! In the meantime, you can play with a sample project that implements what we’ve seen in this post.


The Caliburn Micro posts series

  1. The theory
  2. The first project
  3. Actions
  4. Collections and navigation
  5. Tombstoning
  6. Advanced navigation and deep links
  7. Messaging
  8. Using launchers and choosers
  9. Use your own services
  10. The Application Bar
  11. Pivot
  12. Lazy loading with pivot
Posted in Windows Phone | Tagged , , | 6 Comments

First steps with Caliburn Micro in Windows Phone 8 – Advanced navigation and deep links

In one of the previous posts about Caliburn Micro we’ve explored how navigation is managed in a Windows Phone application developed using MVVM. In this post we’re going to cover some advanced scenarios, like intercepting the navigation events and working with the deep links that are widely used by many Windows Phone APIs.

Deep links

Windows Phone has always supported a way to pass parameters from a page to another using query string parameters: Windows Phone 7.5 has introduced the deep link concept, that is used to provide the same mechanism also when the application is opened from the outside. This feature is widely used: when you have a secondary tile, the navigation that is triggered uses a deep link to identify which tile has been tapped and which is the context to display; when you receive a toast notification and you tap on it the app is opened and you can use a deep link to identify the context and display a specific information; the same happens also for the new Voice control feature: when a voice command is issued, your app receives it using a deep link.

Intercepting this information is trivial in a MVVM application, because usually the operation consists in two steps:

  • Intercepting the OnNavigatedTo event, that is triggered when you navigate towards the current page.
  • Using the NavigationContext class to get access to the query string parameters.

The problem is that both of these operations, usually, can be done only in the code behind of a view: you don’t have access to these events and classes in the view model.

Luckily Caliburn Micro provides a useful naming convention to manage this scenario: it’s enough to declare a property in your view model with the same name of the query string parameter and Caliburn Micro will automatically inject the value retrieved from the URL, in a similar way we’ve seen for the standard navigation in a previous post.

Let’s try it with a sample application and let’s start with the standard scenario: a view (the MainPage.xaml) and a view model, bind together with the standard naming convetion. We’re going to add in the view a button, that will be used to create a secondary tile. Plus, we’ll add also a TextBox, that will be used to display the value returned by the query string.

Here is the XAML:

<StackPanel>
    <TextBox Text="{Binding Name}" />
    <Button Content="Create secondary tile" x:Name="CreateTile" />
</StackPanel>

And here is the code of the view model:

public class MainPageViewModel: PropertyChangedBase
{
    private string name;

    public string Name
    {
        get { return name; }
        set
        {
            name = value;
            NotifyOfPropertyChange(() => Name);
        }
    }

    public void CreateTile()
    {
                    ShellTileData tile = new StandardTileData
                                     {
                                         Title = "Test",
                                     };

            ShellTile.Create(new Uri("/Views/MainPage.xaml?Name=Matteo", UriKind.Relative), tile);
    }

}

The Name property is the one connected with the TextBox, while the CreateTile method defines the template for the secondary tile with just a title. In the end we effectly create the tile, by passing the template and the deep link that identifies the tile. You can notice that the name of the parameter is the same of the property we’ve defined in the ViewModel: Name.

Now launch the application: when you tap on the button the application will be closed, to display the new secondary tile that has just been created. Tap on the secondary tile and… the magic happens again! You’ll see the name “Matteo” displayed in the TextBox. This happens because the parameter in the query string is automatically injected in the property of the view model, since they both share the same name. Cool, isn’t it?

Intercepting navigation events

Another common scenario when you develop a Windows Phone application is to intercept navigation events, so that you can be notified when the view is displayed. Usually the trick is to register the view models of our views with the PerRequest method in the bootstrapper: this way, every time a view is requested a new view model is created, so we can initialize it in the constructor. But, sometimes, this isn’t the best approach and it can’t be applied to every page: for example, the main page is always alive, since it’s always part of the stack of the application’s pages. For this reason, you can’t rely on the public constructor of the view model in case you want do something (for example, refreshing the data) every time the user navigates back to the main page.

For the same reasons I’ve explained when I talked about deep links, it’s an hard task to accomplish in a MVVM application: events like OnNavigatedTo, OnNavigatedFrom or Loaded are available only in the code behind, because a Windows Phone page inherits from the PhoneApplicationPage class. For this reason, Caliburn Micro offers a class to use in our view models, that provides similar events in a view model: the class’ name is Screen and, to use it, you’ll need to let your view model inherit from it.

This class puts together many pieces of Caliburn Micro, so that you don’t have to inherit your view model from too many interfaces. If we take a look at the Screen class, we’ll notice the following definition:

public class Screen : ViewAware, IScreen, IHaveDisplayName, IActivate, IDeactivate, IGuardClose, IClose, INotifyPropertyChangedEx, INotifyPropertyChanged, IChild
{

}

As you can see, this class implements many interfaces, specifically ViewAware, IActivate and IDeactivate that exposes all the needed methos to interact with the view lifecycle. Plus, it implements also the INotifyPropertyChanged event: in case your view model inherits from the Screen class you don’t have to make it inherits also from the PropertyChangedBase class, the method NotifyOfPropertyChange is already supported.

Once your view model is set up, you can override some method to interact with the lifecycle of your view:

public class MainPageViewModel: Screen
{
    protected override void OnViewAttached(object view, object context)
    {
        base.OnViewAttached(view, context);
        Debug.WriteLine("OnViewAttached");
    }

    protected override void OnInitialize()
    {
        base.OnInitialize();
        Debug.WriteLine("OnInitialize");
    }

    protected override void OnViewReady(object view)
    {
        base.OnViewReady(view);
        Debug.WriteLine("OnViewReady");
    }

    protected override void OnActivate()
    {
        base.OnActivate();
        Debug.WriteLine("OnActivate:");
    }

    protected override void OnViewLoaded(object view)
    {
        base.OnViewLoaded(view);
        Debug.WriteLine("OnViewLoaded");
    }

    protected override void OnDeactivate(bool close)
    {
        base.OnDeactivate(close);
        Debug.WriteLine("OnDeactivate");
    }
}

Here is a description of the methods:

  • OnViewAttached is invoked when the view model is set as data context of the view.
  • OnInitalize is called when the view is initalized.
  • OnViewReady is called when the view is ready to be displayed
  • OnViewLoaded is called when the view is fully loaded and every control in the page is initalized
  • OnActivate is called every time the view is displayed
  • OnDeactivate is called every time the view is hided, because you have navigated away to another page or you have closed or suspended the app.

The most important ones are OnActivate and OnDeactivate, that match with the OnNavigatedTo and OnNavigatedFrom events in the page: you can use them to do custom operation that can’t be managed with the helpers provided by Caliburn Micro. Specifically, the OnActivate event is very important because it’s raised when the page is fully loaded and you are able to interact with it: typically this event is used to load in your view model the data that should be displayed in the view. Think about the structure of a view model: usually you are used to load all the data in the view model’s constructor, since it’s invoked every time the view is displayed. In case you need to do asynchronous operations there’s a problem: the constructor of a class can’t be asynchronous.  One approach is to defer the loading operation to another method (for example, LoadData) that is marked as async and that is called in the public constructor.

public MainPageViewModel()
{
    LoadData();
}

private async void LoadData()
{
    MyData = await service.LoadData();
}

Which is the problem of this approach? That LoadData needs to be a void method: it can’t return a Task, because in the view model’s constructor we can’t use the await keyword. This makes the LoadData method a “fire and forget” method: we launch it and we don’t wait until it’s finished. Most of the time this approach works, especially if the loading operation isn’t too long: usually the user won’t immediately interact with the application, so there’s enough time to wait that the data is fully loaded. But, in case the user starts an action that does some operations on our data, that isn’t ready yet, we can have problems. The solution is moving the loading operation inside the OnActivate method, that can be marked as async: this way we can safely execute all the needed asynchronous operations and be sure that when the user will start to interact with the application the data will be ready.

public MainPageViewModel()
{

}

protected override async void OnActivate()
{
    MyData = await service.LoadData();
}


In this case it’s correct that the OnActivate() method’s type is “fire and forget”, since the activation operations are automatically managed by the operating system. It’s the same that happens when we mark as async an event handler: since the event is automatically managed by the OS, there’s no need to wait that the operations are finished before releasing the handler.

The OnActivate method is also very important when we need to manage deep links: it can happen, in fact, that when the view model is created and the constructor is invoked the query string parameters aren’t stored yet in our properties. This happens because the OnNavigatedTo event (that is used to read the parameters) is triggered after that the view model is created. In the deep link sample we’ve seen earlier we couldn’t notice the issue, thanks to the binding: after that the page is fully loaded, the value of the query string parameter was stored in the Name property; thanks to the binding and to the NotifyOfPropertyChange event, as soon as it happened, the TextBox in the view was automatically updated with the value.

However, we could have noticed the issue if we would have tried to manipulate the value of the Name property inside the view model’s constructor: in this case we would have noticed that the value is still null, so any operation on the data would have caused an exception. The workaround is to execute these operations inside the OnActivate method: when it’s triggered the navigation is already completed, so we will find the query string parameter in our Name property as expected.

You can download a sample project the implements what we’ve learned in this post with the link below.


The Caliburn Micro posts series

  1. The theory
  2. The first project
  3. Actions
  4. Collections and navigation
  5. Tombstoning
  6. Advanced navigation and deep links
  7. Messaging
  8. Using launchers and choosers
  9. Use your own services
  10. The Application Bar
  11. Pivot
  12. Lazy loading with pivot
Posted in Windows Phone | Tagged , , | Leave a comment

First steps with Caliburn Micro in Windows Phone 8 – Tombstoning

Tombstoning is the joy and the pain of every Windows Phone developer: it’s a joy because it’s a really smart mechanism to manage the suspension process of an application and to “simulate” that an application has never been closed. But it’s also a pain, because managing it correctly it’s not easy, and this is even more true for a MVVM application. The main reason is that usually tombstoning is managed using the navigation events of a page: when the user navigates away from a page (OnNavigatedFrom) we save the status of the page; when the user navigates to the page (OnNavigatedTo) we retrieve the previous status. in MVVM we don’t have direct access to the navigation events, since they are available only in the view: for this reason, every MVVM toolkit usually provides a way to hook up to these events also in the view model, to properly save and restore the state.

Caliburn Micro uses another approach: we create another class, that is connected to the ViewModel, and we specify what to do when the application is suspended.

Let’s start with a real example: create a new Windows Phone project and add Caliburn Micro using NuGet. As explained in the other post, create a new ViewModel for the first page and connect them using the standard naming convention.

Now we’re going to add a TextBox control inside the page and, using the standard naming convention, we bind it to a string property in our ViewModel so that, everytime the user writes something in the TextBox, the value is saved in the property.

<TextBox x:Name="Name" />


public class MainPageViewModel: PropertyChangedBase
{
    private string name;

    public string Name
    {
        get { return name; }
        set
        {
            name = value;
            NotifyOfPropertyChange(() => Name);
        }
    }
}

Let’s do an experiment first to test the tombstoning process. Let’s start the application: write something in the TextBox, suspend the application by pressing the Start button and then, by pressing the Back button, go back to the application. The text will still be there: this happens because, as a standard behavior, the application is suspended, but the process is kept in memory, so there’s no need to restore the state.

Now we need to simulate the tombstoning: Visual Studio provides a special option in the project’s properties to test it, since there’s no manual way to trigger it. The operatying system always suspends an application, as a standard behavior: only when the system is getting low on resources it can choose to tombstone an app. You can find this option by right clicking on the project in Visual Studio: choose Properties and, in the Debug tab, you’ll find a checkbox, with the label “Tomstone upon activation while debugging”. Enable it and now repeat the previous test: you’ll notice that, this time, when the application is activated the text in the TextBox will be gone.

Here comes tombstoning: we need to save the value in TextBox and restore it when the application is activated. Caliburn Micro provides an easy way to do it: you’ll have to create another class, that will manage the tombstoning for you.

This class will have to inherit from the StorageHandler<T>, where T is the ViewModel of the view which state we need to save. Here is an example:

public class MainPageModelStorage: StorageHandler<MainPageViewModel>
{
    public override void Configure()
    {
        Property(x => x.Name)
            .InPhoneState();
    }
}

When you implement the StorageHandler<T> class you are required to implement the Configure method, that contains the “instructions” for Caliburn Micro about what to do when the app is suspended. We use the Property object and, using a lambda expression, we specify which property of the View Model we want to save during the suspension. The Intellisense will help you: since x, in the lambda expression, is your ViewModel (in the sample, MainPageViewModel), you’ll have access to all the public properties you have defined (in our sample, the Name property). In the end you can specify where the status should be saved: with the method InPhoneState() the property is saved in the transient Windows Phone state, that is erased in case the application is closed or opened from the beginning. It’s the perfect solution for our scenario: imagine that our TextBox is part of a form, that the user needs to fill. It’s important to keep the status if the app is suspended, but it’s correct to start over from scratch in case the application is restarted.

In case, instead, we want to restore the value of our property every time the app is restored, we can use the InAppSettings() method:

public class MainPageModelStorage: StorageHandler<MainPageViewModel>
{
    public override void Configure()
    {
        Property(x => x.Name)
            .InAppSettings();
    }
}

Let’s try it: open the application, write something in the TextBox and suspend it. If you press Back, the app will be reopened and the text will still be there, even if we’ve told to the the project to tombstone the app: Caliburn Micro has automatically saved and restored the value of the Name property of our ViewModel and the final result, for the user, is that it’s like the app has been regularly suspended. If we close the app using the Back button instead of suspending it and we open it again, this time the text will be gone: it’s correct, because we’ve saved the status in the phone state. If we change the Configure method of the MainPageModelStorage class to save the data in the application settings, instead, we will notice that the text in the TextBox is restored even after the app has been closed.

It’s not over yet

We haven’t finished yet to dig about Caliburn Micro: we still have to see how to manage messaging. Stay tuned, meanwhile you can play with the sample project below.


The Caliburn Micro posts series

  1. The theory
  2. The first project
  3. Actions
  4. Collections and navigation
  5. Tombstoning
  6. Advanced navigation and deep links
  7. Messaging
  8. Using launchers and choosers
  9. Use your own services
  10. The Application Bar
  11. Pivot
  12. Lazy loading with pivot
Posted in Windows Phone | Tagged , , | 3 Comments

First steps with Caliburn Micro in Windows Phone 8 – Collections and navigation

We continue our journey about Caliburn Micro and how to use this MVVM framework in a Windows Phone 8 application by understanding how to manage collections and navigation.

Collections

One of the most common scenarios in a Windows Phone application is the usage of collections: we have a list of data and we need to display it in a ListBox or in LongListSelector. The standard approach is to create a collection in the code (usually, when we’re talking about the XAML world, we use an ObservableCollection) and then to bind it to the ItemsSource property. Guess what? Caliburn Micro has another naming convention for that! And a pretty smart one too! To assign the collection to the ItemsSource property we use the standard naming convention we already know: the name of the property in the view model should match the name of the control. But here comes the smart decision: if you create a property which name is Selected followed by the name of the control in singular, it will be automatically bound with the SelectedItem property of the control. Let’s make an example:

<ListBox x:Name="Items">
    <ListBox.ItemTemplate>
        <DataTemplate>
            <StackPanel>
                <TextBlock Text="{Binding}" />
            </StackPanel>
        </DataTemplate>
    </ListBox.ItemTemplate>
</ListBox>


In the XAML we add a ListBox with a simple template: it will simply display, for every item in the collection, a TextBlock with the value of the single item. The name of the ListBox is Items so, by following the Caliburn Micro naming convention, we expect to have in the view model a property called Items, which is the collection that will be displayed.

private ObservableCollection<string> items;

public ObservableCollection<string> Items
{
    get { return items; }
    set
    {
        items = value;
        NotifyOfPropertyChange(() => Items);
    }

}

And here’s come the magic:

private string selectedItem;

public string SelectedItem
{
    get { return selectedItem; }
    set
    {
        selectedItem = value;
        NotifyOfPropertyChange(() => SelectedItem);
        MessageBox.Show(value);
    }
}

As you can see the name of the property is SelectedItem, which is the name of the other property in singular (Items –> Item) prefixed by the word Selected. In the setter of the property we’ve added a line of code to display, using a MessageBox, the value of the selected property, that will be helpful for our tests. Now let’s try it: in the public constructor of the view model let’s add some fake data and assign it to the Items property.

public MainPageViewModel()
{
    Items = new BindableCollection<string>
                {
                    "Matteo",
                    "Mario",
                    "John"
                };
}

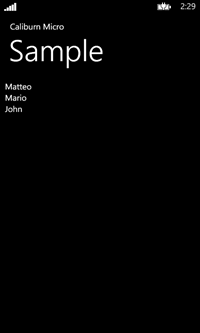
If you launch the application and you’ve correctly followed the steps the ListBox will contain the three test values we’ve defined: by tapping on one of the elements a MessageBox with the selected name will appear.

list1list2

Navigation

Usually managing the navigation from a page to another of the application is one of the trickiest tasks using MVVM. The biggest problem to face is that in Windows Phone we use the NavigationService, that can be used only in the code behind that is connected to a view. You can’t directly access to it from another class, for example, like a ViewModel. To support the developer Caliburn Micro comes with a built in NavigationService, that can be used in a ViewModel by simply adding a reference in the public constructor of the application. The built in dependency injection container will take care of resolving the dependency for you and will give you access to it. So, the first thing to use manage navigation in a MVVM application developed with Caliburn Micro is to change the public constructor of your view model, like in the following example:

public class MainPageViewModel : PropertyChangedBase
{
    private readonly INavigationService navigationService;

    public MainPageViewModel(INavigationService navigationService)
    {
        this.navigationService = navigationService;
    }
}

From now on, you’ll be able to use the NavigationService inside your view model: you won’t have to register anything in the bootstrapper, since Caliburn Micro will take care of everything (as for every other service that is embedded with the toolkit).

The NavigationService that comes with the toolkit supports a view model first approach: instead of declaring which is the URL of the page where we want to take the user (that is the standard approach), we declare which is the ViewModel we want to display. The service will take care of creating the correct URL and display the view that is associated with the view model. Let’s see how does it work.

First we need a new page where to redirect the user: add to your project a new page and a new class in the ViewModels folder. Remember to use the naming convention we’ve learned in the second post of the series: if the name of the page is Page2View.xaml, the name of the ViewModel will have to be Page2ViewModel.cs. Before moving on, you have to remember to register the new view model in the Configure method of the bootstrapper, like in the following example:

protected override void Configure()
{
    container = new PhoneContainer(RootFrame);

    container.RegisterPhoneServices();
    container.PerRequest<MainPageViewModel>();
    container.PerRequest<Page2ViewModel>();
    AddCustomConventions();
}

Now add a button in the main page of your application and, using the naming convention we’ve learned in the previous post, assign to it a method in your view model, that will trigger the navigation towards the second page.

 <Button Content="Go to page 2" x:Name="GoToPage2" />


public void GoToPage2()
{
    navigationService.UriFor<Page2ViewModel>()
        .Navigate();
}

With the UriFor<T> method of the navigation service we get the needed URL for our view model, then we call the Navigate()method to trigger the navigation and redirect the user to the requested page.

Navigation with parameters

You should already know that, when navigating from a page to another, you are able to carry some parameters in the query string, that can be used in the new page, like in the following sample

/Page2View.xaml?Name=Matteo

Using the NavigationContext you are able, in the view Page2View.xaml, to retrieve the value of the Name property that is passed using a query string. How to do it using Caliburn Micro? The first thing is to define, in our destination page’s view model (in our example, the class Page2ViewModel) a property, that will hold the  value of the parameter.

public class Page2ViewModel: PropertyChangedBase
{
private string name;

public string Name
{
    get { return name; }
    set
    {
        name = value;
        NotifyOfPropertyChange(() => Name);

    }
}

Then, we change the navigation operation like this:

public void GoToPage2()
{
    navigationService.UriFor<Page2ViewModel>()
                     .WithParam(x => x.Name, "Matteo")
                     .Navigate();
}

We’ve added the method WithParam, that accepts two parameters: the first one is the property of the destination view model that will hold our value and it’s specified using the lambda syntax (x represents the destination view model, in our example the instance of the Page2ViewModel class); the second parameter is the value that the property will have. When the Page2View.xaml view will be loaded, the Page2ViewModel will hold, in the Name property, the value of the parameter we’ve passed during the navigation, so we can use it for our purposes. For example, we can simply display it by adding a in the XAML a TextBlock with the same name of the property (do you remember the naming convention?)

<Grid x:Name="ContentPanel" Grid.Row="1" Margin="12,0,12,0">
    <StackPanel>
        <TextBlock x:Name="Name"></TextBlock>
    </StackPanel>
</Grid>

Important! It’s true that Caliburn Micro does a lot of magic, but the navigation with parameter feature is still based on query string parameter. The only magic is that these parameters are automatically injected in the properties of your view model, but they still are strings: you can use the WithParam method to pass to the new view just plain values, like strings and number. You can’t use it to pass complex objects.

To be continued

The journey is not ended yet, we still have to see how to manage messages and tombstoning with Caliburn Micro. Coming soon in the next posts! While you wait, you can download the sample project and start playing with it!


The Caliburn Micro posts series

  1. The theory
  2. The first project
  3. Actions
  4. Collections and navigation
  5. Tombstoning
  6. Advanced navigation and deep links
  7. Messaging
  8. Using launchers and choosers
  9. Use your own services
  10. The Application Bar
  11. Pivot
  12. Lazy loading with pivot
Posted in Windows Phone | Tagged , , | 19 Comments

First steps with Caliburn Micro in Windows Phone 8 – Actions

In the previous post we’ve seen how  to setup a Windows Phone application to use Caliburn Micro as a MVVM Framework. We’ve seen also the first conventions used by the toolkit, to connect together a View with its ViewModel and to bind a property to a control’s property. In this post we’ll see how to connect a control to an action, so that when the user interacts with the control the action is executed.

Commands in Caliburn Micro

Usually to accomplish this task using MVVM Light or the standard XAML approach we use the Command property: we would define an object that implements the ICommand interface and define the operation that should be executed when it’s invoked. In the end, the object is connected with the Command property of a Button, for example, using binding. This approach is very repetitive, because we need to create an ICommand object for every operation while, in the end, what we really need is to define just the method that should be invoked. Caliburn Micro avoid this requirement by using, guess what, a naming convention, similar to the one we’ve seen to bind properties to a control. Basically, you just need to declare in your view model a method which name matches the name of the control.

For example, declare a Button like this:

<Button Content="Show name" x:Name="ShowNameAction" />

Then, in your code, you’ll have a method like the following one:

public void ShowNameAction()
{
    MessageBox.Show("Clicked");
}

Now if you launch the application and you press on the button you’ll see the message on the screen. The magical naming convention did the trick again! Smile And what if we need a property to set the content of the button and, at the same time, an action to be triggered when the button is clicked? In this case we have a conflict with the naming convention rule: we can’t have in the view model both a method and a property with the same name.

In this case, we need to use the long syntax, that uses the behaviors available in the System.Windows.Interactivity namespace. For this reason, we need to add to our XAML the following namespaces:

xmlns:i=”clr-namespace:System.Windows.Interactivity;assembly=System.Windows.Interactivity”
xmlns:cal=”clr-namespace:Caliburn.Micro;assembly=Caliburn.Micro”

Now you need to change the Button declaration like in the following sample:

<Button x:Name="ShowName">
    <i:Interaction.Triggers>
        <i:EventTrigger EventName="Click">
            <cal:ActionMessage MethodName="ShowNameAction" />
        </i:EventTrigger>
    </i:Interaction.Triggers>
</Button>

As a label for the button will be used a property called ShowName declared in the ViewModel; instead, the ShowNameAction method will be executed when the button is clicked. One advantage of using this syntax is that you are able to attach a method also to other events: by default, using the standard naming convention, a method is hooked with the default event of the control (in case of a Button, it’s the Click event). With this syntax, instead, it’s enough to change the EventName property of the EventTrigger with another one (for example, DoubleTap) to connect the method with that event.

Caliburn Micro provides also a short syntax to do the same:

<Button cal:Message.Attach="[Event Click] = [Action ShowName]" />

The syntax is very simple: by using the Message.Attach attached property we define first the event we want to hook (with the keyword Event followed by the name of the event), then the name of the method that should be executed (with the keyword Action followed by the name of the method). The pros of the long syntax is that is supported by Blend, but it’s more verbose; the short syntax is easier to remember and to use, but Blend doesn’t like it. It’s up to you which syntax to use: personally I don’t use Blend too much, so losing the ability to see and interact with the button in Blend is not a big deal for me.

Controlling the action

One of the most interesting features that is available in the command pattern is the CanExecute concept: every command can be controlled by the developer, so that he can enable or disable it according to a specific condition. The coolest thing is that the control that is bound with the command will automatically change his status according to this condition: if the command is disabled, for example, the button will be grayed and the user won’t be able to click on it.

Basically, the CanExecute action returns a boolean value, that determines if the command can be executed or not. Every time something changes, this action should be evaluated again. A classic example is a form, that shouldn’t be submitted until the user has filled all the required fields. By default, the submit button is disabled but, every time a field is filled by the user, the action should be evaluated again, because the status of the button can change.

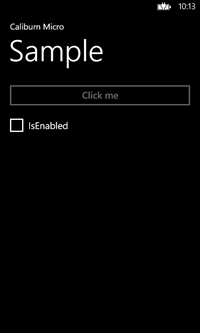
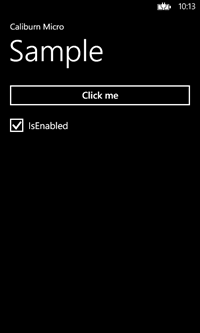
Also in this case Caliburn Micro uses conventions to support this feature: you just need to create in your ViewModel a boolean property, with the same name of the method prefixed by the Can word. Here is how to extend the previous example, by adding a Checkbox in our page, which we’re going to bound to a boolean property. The button should be activated only when the checkbox is enabled.

Here is the XAML in the view:

<StackPanel>
    <Button x:Name="ShowName" Content="Click me" />
    <CheckBox x:Name="IsEnabled" Content="IsEnabled" />
</StackPanel>


And here is the code in our ViewModel:

public class MainPageViewModel: PropertyChangedBase
{
    private bool isEnabled;

    public bool IsEnabled
    {
        get { return isEnabled; }
        set
        {
            isEnabled = value;
            NotifyOfPropertyChange(() => IsEnabled);
            NotifyOfPropertyChange(() => CanShowName);
        }
    }

    public bool CanShowName
    {
        get { return IsEnabled; }
    }

    public void ShowName()
    {
        MessageBox.Show("Clicked");
    }
}


As you can see, other than defining the ShowName method (that is invoked when the ShowName button is clicked), we create a boolean property which name is CanShowName. In the end, we create a property called IsEnabled, that is connected to the checkbox in the view. This way, every time the checkbox is enabled, the IsEnabled property is set to true and the same happens for the CanShowName property. The only thing to highlight is that, every time we change the value of the IsEnabled property, we call the NotifyOfPropertyChange method not only on the property itself, but also on the CanShowName property. This way, every time the IsEnabled property changes, also the CanShowName property is evaluated again and the button’s status is changed according to the new value.

action1action2

To be continued

In the next posts we’ll keep digging in using Caliburn Micro, to manage collections, tombstoning, messaging and navigation. For the moment, you can start playing with the sample project below to take a deeper look to what we’ve learned in this post.


The Caliburn Micro posts series
  1. The theory
  2. The first project
  3. Actions
  4. Collections and navigation
  5. Tombstoning
  6. Advanced navigation and deep links
  7. Messaging
  8. Using launchers and choosers
  9. Use your own services
  10. The Application Bar
  11. Pivot
  12. Lazy loading with pivot
Posted in Windows Phone | Tagged , , | 4 Comments