One of the requisites to pass the certification for a Windows 8 application is to provide a support page, where the user can find all the information needed to get in touch with the developer. This requirement is inherited directly from the Windows Phone world, even if, some time ago, this feature has turned from required to optional. Usually, in a Windows Phone application, developers provided a separate page: users are able to reach it using a button in the main view or in the application bar.
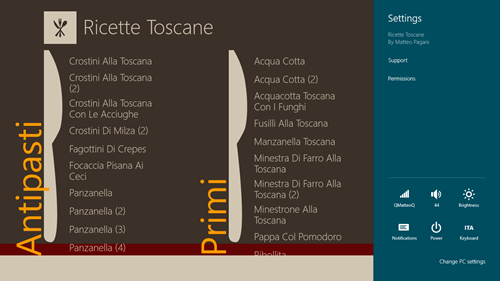
In Windows 8 applications we have a new way to manage this requirement, without having to create a separate page just to display some contact information: the Settings panel. This panel is displayed in the charm bar (that appears when the user moves the mouse at the right top corner of the screen) and it’s the ideal place where to insert all the stuff related to the settings of the application. It’s also a good position where to place the support page of our application.
Let’s see how to do this in a XAML / C# application.
Create the support page
To create the support page it’s enough to add a simple standard page to the project, where we’re going to place all the information to contact the developer: a website’s url, a mail address, a Twitter account, etc.
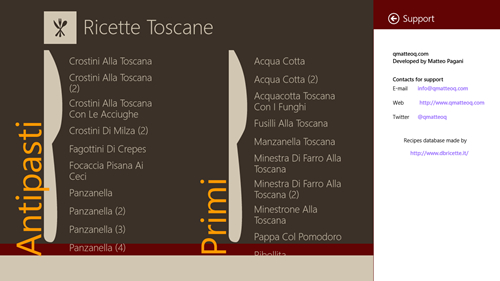
There’s nothing special to tell about this info page: it should be a standard XAML page, that uses the Basic Page template. While adding content to this page we have just to keep in mind that just a small portion of it (more precisely, the left side) will be displayed in the settings panel, so be careful aligning the controls un the correct way.
Attach the page to the settings panel
Now that we have a page to display, we have to “attach” it to the Settings panel, in order to allow users to access to it. To achieve this results we’re going to use a third party library available on Nuget and GitHub, called Callisto. This toolkit features a lot of useful controls for developing Windows 8 applications: one of them is the SettingsFlyout control, that exactly it our needs.
Which is the purpose of this control? Usually the settings panel is based on a primitive WinRT control called Popup: this control is based on a “light dismiss” logic and many Windows 8 controls are based on it. Basically, using this logic means that something is displayed on the screen and the user can dismiss it by simply tapping in an area outside of the control. The settings panel is a good example of this behavior: if you invoke it by using the charm bar and then you tap somewhere else in the screen, the settings panel is hided.
Let’s see how to use it: the first thing is to install Callisto in our project, just search for Callisto in Nuget and install the package that will be displayed in the results page.
The next step is to register in the application the event that is raised every time the user tap on the settings icon in the charm bar: when this event is raised, we’re going to set our command that will attach the setting page to the panel.
The event is called CommandsRequested and it’s available in the SettingsPane object; to use it, first, we have to get settings panel for the current view by calling the GetForCurrentView() method, like in the following example:
SettingsPane.GetForCurrentView().CommandsRequested += MainPage_CommandsRequested;
Now we have to manage the event handler (that in this example is called MainPage_CommandsRequested), where we are going to register a SettingsCommand, that is invoked when the user presses the settings icon in the charm bar.
The settings command accepts three important parameters:
- the command id, that should be unique;
- the label that is displayed in the Settings panel to access to our info page;
- the handler that is invoked, where we are going to use the SettingsFlyout class that is available in the Callisto toolkit.
Let’s see the code first:
void MainPage_CommandsRequested(SettingsPane sender, SettingsPaneCommandsRequestedEventArgs args)
{
    SettingsCommand command = new SettingsCommand("Support", "Support", (x) =>
    {
        SettingsFlyout settings = new SettingsFlyout();
        settings.Background = new SolidColorBrush(Colors.White);
        settings.HeaderBrush = new SolidColorBrush(Color.FromArgb(255, 99, 4, 4));
        settings.Content = new InfoPage();
        settings.HeaderText =
            "Informazioni";
        settings.IsOpen = true;
    });

    args.Request.ApplicationCommands.Add(command);
}
The first step is to create an instance of the SettingsCommand: in this example Support is both the command id and the label that is displayed in the Settings pane. As I said earlier, the third parameter is the command that is effectively invoked when the command is issued: in this handler we’re going to create an instance of the SettingsFlyout control, that will “encapsulate” the info page we’ve created earlier and adapt it to be inserted in the settings panel.
The SettingsFlyout control has many properties that allow us to customize it: we can set the background color, the brush and the text of the header and so on; the most important one is the Content property, that defines the content of the panel. In this case, we’re simply going to create a new instance of the support page we’ve created in the beginning of this post (in my example, it’s called InfoPage).
The last two important things are to set the IsOpen property to true and then to add the command ApplicationCommands collection, that contains all the commands that are available in the Settings panel. We can access to this collection using the Request object, that is one of the properties of the SettingsPaneCommandRequestedEventArgs parameter of the handler.
And.. we’re done! We can simply register the CommandsRequested handler when the application starts: the result is that, when the user will tap on the Settings icon in the charm bar, he will see an item called Support: clicking on it will display the support page with the light dismiss logic described before.
You can see the final result in the following images, while Support page sample application that will help you to implement what we’ve discussed in this post.


you know that you explain it very well? good post!
Thanks Dario 🙂